
Did you know that only 25% of people believe they live up to their creative potential? This means just one thing – there’s a lot of space for progress for the rest of us.
Even though we tend to think of creativity as something reserved for artists or designers, the truth is that we all need to get creative from time to time. More specifically, whenever we’re looking to solve a new problem.
And the good news is that everyone can be creative. You just have to play with your brain a little.
To help you become more creative, here’s a list of the 10 best creative techniques with a step-by-step guide on how to use them.
But first, let’s take a look at why creative thinking matters.
What makes creative thinking so important?
Creative thinking is a part of every project. Yes, even your accountant needs to be creative from time to time. We need creative thinking whenever we’re looking for a unique solution to a problem. Whether in accounting, while developing a new design, or looking for new blog post ideas.
Generating ideas gives you and your business a competitive edge, stimulates personal development, and drives innovation.
Here are some of the main benefits of creative thinking:
- Innovative solutions – creative thinking helps you think outside the box to find innovative and effective solutions to complex problems
- Adaptability – in a rapidly changing world, creative thinking allows you to adapt quickly by coming up with new strategies and methods
- Entrepreneurship – creativity is at the heart of entrepreneurship, helping you identify market gaps, create novel products, and establish new businesses
- Self-expression – creative thinking fosters self-expression and helps you articulate ideas and emotions through art, writing, and innovation
- Improved learning – creative thinking encourages active learning and critical thinking, making education more engaging and effective
- Interdisciplinary collaboration – creative thinking encourages collaboration, leading to multidisciplinary innovations that can solve more complex challenges
Supercharge your marketing reviews
Share, review, and approve all your content in one place with Filestage.
10 creative brainstorming techniques to generate more (and better) ideas
In our day-to-day jobs, we often get stuck in a routine, handling tedious tasks requiring little-to-no creativity. And when the time comes for us to get creative we find ourselves staring at a blank paper for hours. Often, completely avoiding creative work.
Luckily, there are numerous ways to get into a more creative headspace.
Here are the 10 most effective creative brainstorming techniques.
1. Mind mapping
Creative work can often be very murky. As you work through a creative project, it can become difficult to develop ideas and trace your thoughts.
This is where mind mapping helps.
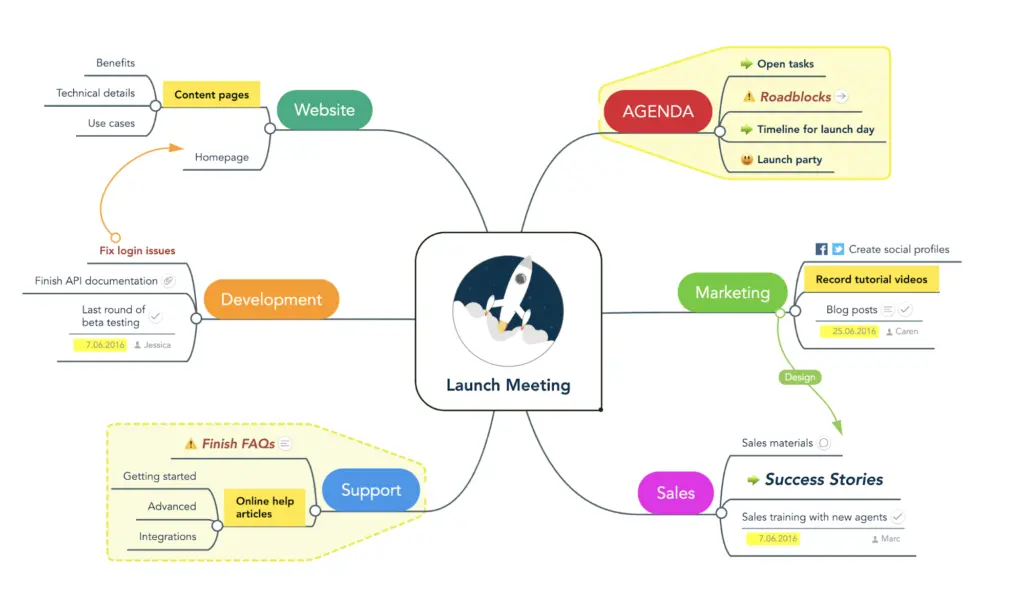
Mind mapping is the process of using visuals and graphics to represent ideas and structure important pieces of information. By using this brainstorming technique, you’ll be able to better organize, analyze, understand, and recall all your ideas.
Here’s a great example from MindMeister of what a mind map might look like for your idea generation.
How to create a mind map
Mind mapping is a creative process, making it slightly different for everyone. iMidQ has a great guide on how to make a mind map.
Here’s how to create a mind map in eight simple steps:
- Start with a central idea – Write down the central concept or idea in the middle of your page or digital canvas. Having a central image or keyword will help you capture the essence of the main topic.
- Add branches for major categories – Extend lines from the central idea to represent major subtopics or categories. Write a word or phrase on each branch to mark the subtopic.
- Expand with sub-branches – For each subtopic, add additional branches to include more specific details or related ideas. Keep the information concise by using single words or short phrases.
- Include images and symbols – Incorporate images, symbols, or icons to represent ideas visually. Images will help you retain information and make the mind map more engaging.
- Use colors – Use different colors for different branches or categories to make the map easier to understand. Colors will help you emphasize certain points or differentiate between ideas.
- Keep a hierarchical structure – Make sure there’s a clear hierarchy from the central idea to the subtopics and further down to the branches. This way you’ll maintain clarity and make it easier to follow the flow of ideas.
- Connect related ideas – If ideas on different branches are related, draw lines or arrows to connect them. This way you’ll highlight relationships and improve understanding of how the ideas are interconnected.
- Review and refine – Go over your mind map to add, remove, or reorganize information as necessary. Make sure the mind map is logical and coherent, with all ideas properly connected and categorized.
2. Six thinking hats
Creative work is fun and exhilarating. But it can also quickly become frustrating when you keep running around in circles, stuck on one idea.
With De Bono’s “Six Thinking Hats” technique you can see your ideas from different perspectives and open doors for new creative solutions.
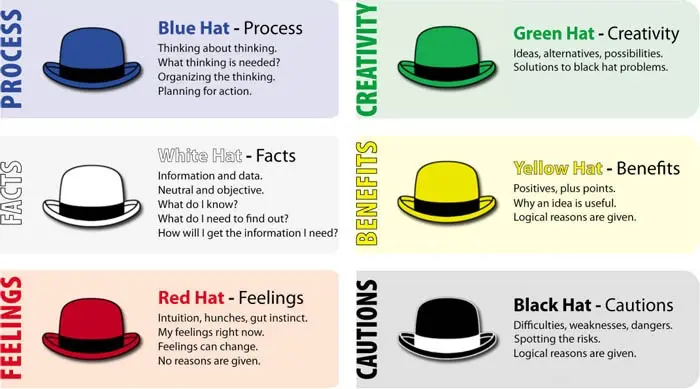
Source: onedaydesignchallenge.com
How to use the six thinking hats technique
For every brainstorming session you run, try each of these six hats. You’ll be surprised by the ideas you’ll come up with by the end of the process!
Here’s how your creative process can look with this technique:
- Blue Hat – Start by thinking about the creative process. You can list the steps and everything you’ll need to come up with great ideas. Think of this step as organizing your thinking.
- White Hat – Focus on the facts. What do you need to know about this project that will help guide your creative process? List all the trues and falses about the project to stir your creativity in the right direction.
- Red Hat – How do you feel about the project? What is your gut feeling telling you? Dedicate some time to thinking about your feelings on the project and see what comes out of it.
- Green Hat – This is where the creative thinking comes to fruition. Give yourself the freedom to list all the crazy ideas, possibilities, and solutions you can think of.
- Yellow Hat – It’s time to focus on the positives. What are all the benefits of this solution? Why is this specific idea such a good solution? Think of as many benefits as you can.
- Black Hat – Every project has its risks and weaknesses. And it’s important to anticipate as many risks and downsides as you can possibly think of. The more prepared you are, the less likely you are to get stuck during your project.
3. Design sprint
When it comes to ambitious projects like creating a prototype, it takes a lot of work to get them off the ground. The big picture feels intimidating and the whole team needs help finding the right steps to begin with. That’s why some entrepreneurs turn to design sprints.
This rigorous system puts a strong checklist structure in place so that you and your team can break free from the big-picture anxiety. This way, you’ll quickly generate ideas and progress from the initial problem to a tested solution.
With a solid structure in place, you’ll be forced to move through a step-by-step checklist and unlock new creative solutions to your problems.
How to use the design sprint technique
The typical design sprint takes place over one week and each day is dedicated to a specific task. The Sprint Book offers a great breakdown of the five Design Sprint sections.
Here’s what a one-week design sprint looks like:
- Monday: Mapping – This step is all about outlining your key questions and defining your goals. You should also create a map of your product or service to identify risks and opportunities.
- Tuesday: Sketching – On Tuesday, you’ll want to dive deeper into your map and tackle your risks and opportunities. This should be done both alone and in a group.
- Wednesday: Decisions – On Wednesday, it’s time to review the solutions you generated on Tuesday. You should decide which solution you’re going for, test it as a group, and then sketch it into a storyboard. This will give you a step-by-step plan for your mock up.
- Thursday: Mock up – On Thursday, it’s time to build a realistic-looking mock up. This version should simulate the finished solution as effectively as possible so that you can pitch it to your potential audience and collect data.
- Friday: Test – With your solution in hand, it’s time to put it to the test. Show it to your customers and collect as much data as possible to help you perfect it.
4. Lean canvas
The lean canvas is a single-page business plan that helps business founders and other professionals get creative about articulating their business plans.
The plan is made up of nine distinct building blocks. You can use this structure to communicate your ideas clearly and concisely so that others can get behind them.

How to use the lean canvas technique
Lean canvas was created in response to a problem many new businesses face – it simply takes them far too long to write a plan, making it quickly outdated.
There are nine key points, or building blocks, that you’ll need to work through in sequence. But Lean Canvas only takes around 20 minutes to create. You can see now why it’s become a very useful tool for startups, right?
5. Brainstorming
At one point or another, we’ve all got together as part of a group to throw new ideas around and produce unique solutions to challenging problems. This makes us all familiar with the concept of group brainstorming techniques.
It’s a fun and energizing activity that helps countless teams think of new ideas and find solutions to their problems. It’s particularly useful for creative professionals, who need to produce something unique.
How to use the brainstorming technique
A brainstorming session might seem random, but it’s often best to go into the activity with a step-by-step plan.
BDC is a Canadian bank that focuses exclusively on entrepreneurs. In this piece, they outline exactly how to organize a successful brainstorming session. Here’s a quick look at the six steps that are involved:
- Define your problem accurately
- Establish your context and definitions
- Appoint a facilitator to keep track of the session
- Invite the appropriate people to participate
- Set an agenda that lasts around 20 minutes
- Host the session
6. Reframing
Creatives can easily fall into the trap of looking at an issue through a single frame or mindset. That’s when it becomes beneficial to shake things up and reframe the problem.
Reframing problems gives a new outlook or a fresh point of view, allowing you to innovate and find more creative solutions.
How to use the reframing technique
There are a series of thought experiments and techniques that you can use to reframe issues.
Here are just a few helpful strategies:
- Take your bad ideas and re-examine them in more detail – is there something valuable there?
- Look at your assumptions and challenge each of them – are your assumptions incorrect and could this change/resolve your challenge?
- Reword your question – does this create some exciting new possibilities?
- Think as if you’re somebody else – could another person have a different perspective or suggestion?
7. Mood boards
Abstract thinking is challenging. And chasing after great ideas in your mind can feel like trying to catch the wind with a net – they’ll always fly away.
That’s why it’s a great idea to materialize your abstract thoughts. With mood boards, everyone on your team can use various symbols, existing projects, and inspiration materials to help bring new ideas to life.
Mood boards are a great tool for improving creative collaboration within your team and making sure everyone is on the same page about the overall feel of the project.
How to create mood boards
There are lots of different techniques and tools you can use for creating mood boards. If you’re making a virtual mood board for smooth remote collaboration, you can choose Canva or Adobe Spark software solutions. But if you’re looking for a physical mood board, there’s no better solution than the good old whiteboard.
The only thing that matters is that the tool and the technique suit the project you’re working on.
Here are a few areas that you might want to focus on when creating your mood board:
- Emotions
- Imagery
- Colors
- Shapes
- Words
- Textures
8. Storyboards
If you’re trying to create a video or other narrative-based creative content, you’ll want to give form to your ideas. This can help you understand your ideas in real life and make it easier to share them with others.
A storyboard is a great way to evaluate your ideas and discover what works and what doesn’t. Creative professionals often use a storyboard template to get started quickly and share their ideas.
How to create storyboards
Storyboards are packed with information. In a single document, you’re sharing your thoughts about imagery, scripts, music, movement, and the overall atmosphere.
Here’s a great guide on how to create a storyboard from wikiHow. This simple guide walks you through all the essential steps you’ll need to take to create a detailed and descriptive storyboard that accurately communicates your ideas.
9. Pretend and fake it
There’s a lot of scientific background behind the “fake it til you make it” approach, showing the true power of our minds.
One study showed that we can activate specific neurons simply by thinking about doing something. For example, you can think about driving a car, imagine the situation, and activate neurons that usually light up when you’re driving a car.
The same goes for brainstorming about your project. So the technique is simple, and it helps you get started. All you have to do is – fake it!
If you’re struggling, the idea behind this technique suggests that you should trick yourself into working.
Give yourself fifteen minutes to work on whatever you hope to achieve – you might be surprised by where this metaphorical thinking takes you.
How to use the pretend and fake it technique
This is a very simple process. All you have to do is start working! Pretend there are no obstacles you need to overcome, and give yourself the freedom to write down anything that comes to mind.
We recommend that you set a timer so that you power through rather than getting frustrated and giving up.
At the end of the timeframe, review your work and assess your results carefully. Ask yourself questions about what you did and why and how it worked.
10. 100 Ideas
All too often, creative professionals second-guess their ideas and then reject them before they’ve even put pen to paper!
If this sounds like you, you should try the 100 ideas challenge. Essentially, you’ll set a timer for 15 to 30 minutes and write down as many ideas and solutions as you can.
Write down random words that come to your mind, even if they seem stale – you’ll be surprised by how far these simple ideas can take you.
You’ll probably struggle at the beginning. But it’s important that you write down a lot of ideas before discarding them.
How to use the 100 Ideas technique
With this technique, the trick is to track your time diligently – don’t give up too early! Any random word might end up solving the puzzle. That’s why it’s important to push yourself to get lots of ideas. You might also want to try this as part of a group so you get the best results.
Final thoughts
There’s no better feeling than finding a unique, innovative solution to a difficult problem you’ve been struggling with for a while. And the feeling gets even better if you can do it without wasting days or weeks procrastinating.
Hopefully, these creativity techniques will help you reach epiphany sooner in your next project and give your business a competitive edge. They’re ideal for taking your creative project management skills to the next level.
And if you’re looking for a solution to help you get quicker approval on your creative work, sign up for a free Filestage trial →