
Creativity that just goes with the flow is nice and all, but it won’t help you deliver effective marketing campaigns. For that, you need a clear, reliable process. I know, not very sexy. But trust me, it works. (What’s that? You don’t trust some random person on the internet? Totally reasonable. Here’s a stat to back it up: 75% of projects fail because they don’t follow a clear plan.)
With that said, today I’m going to show you how to streamline your team’s output and enhance your creative production with the help of a smart, efficient workflow process.
By the end of this article, you’ll have picked up a ton of new insights and actionable tips. Things like:
- The benefits of creative workflow management
- How to build a creative workflow, step by step
- A sample creative workflow you can use today
But before we get into all of that good stuff, let’s quickly define what a creative workflow actually is and how it works.
What is a creative workflow?
In simple terms, a creative workflow process is a set of steps that take a project from creative brief through to final delivery. It maps out how ideas evolve into tangible outputs, such as designs, videos, campaigns, or copy.
An effective creative workflow should include task management to clearly assign tasks and define each task, who is responsible for it, as well as how assets will move through the production line to make sure every deadline gets met.
Creative processes differ across industries, teams, and project scope, but a typical creative workflow will include:
- Intake and briefing
- Ideation and concept development
- Content production
- Review and approval
- Finalization and delivery
- Tracking, archiving, and assessment
But don’t be fooled, a creative workflow is more than a numbered list of tasks. It’s a living, breathing framework that gives your creative team clarity, with a repeatable approach they can follow to deliver top quality marketing content and campaigns.
We’ll take a closer look at how you can execute each stage of a creative workflow a little later in the article.
Supercharge your creative workflow
Share content, get feedback, and manage approvals all in one place with Filestage.
Is creative workflow management worth it? (spoiler: yes)
A good creative workflow is one of the most impactful things you can implement in your creative team. It doesn’t just make things tidier. It directly improves the quality, speed, and consistency of your creative output.
Let’s take a look at some of the biggest benefits of creative workflow management.
1. Better resource management
By defining your creative team’s workflow, you can see exactly who’s working on what, when they’re working on it, and what they need to get the job done. This helps you:
- Avoid overloading your creatives
- Allocate work based on availability and skill
- Plan ahead for busy periods or campaign launches
Instead of sprinting from one urgent request to the next (sound familiar?), your team can make smart decisions and allocate enough time and resources to deliver work that gets results.
2. More predictable deadlines
Creative work can be chaotic enough as it is. So anything that can help your team members stay in control is a bonus. A structured process breaks a project into manageable steps, each with its own timing and owner. That means no more unexpected delays or dreaded “That’s due today??” moments.
With a solid plan, stakeholders know when they’ll see drafts, creative teams know when they need to deliver, and reviewers know when feedback is expected. Dreamy!

3. Reduced duplication and rework
If you’ve ever found yourself working on, or reviewing, the wrong file version, you’ll know how frustrating it can be. Without a formal workflow, it’s incredibly easy for creative teams to:
- Work on outdated versions
- Duplicate tasks
- Miss feedback
- Chase approvals
- Accidentally produce the same asset twice
On the flip side, project monitoring with a well-managed workflow will help your creative team avoid these blockers, by tracking versions and ensuring everyone is on the same page. This can save hours (sometimes, even days!) of unnecessary rework and confusion.
4. Fewer creative slip ups
No matter what kind of creative project you’re working on, the creative review process is essential. And it’s something many creative teams struggle with. A structured creative review workflow ensures:
- Legal reviews happen at the right stage
- Brand guidelines are followed
- Claims and messaging are approved
- Audit trails are automatically documented
Everyone can make mistakes from time to time, especially when they’re juggling a gazillion creative projects at once. So you need a strategic review process that reduces the risk of publishing content that’s inaccurate, non-compliant, or off-brand.
5. Smoother collaboration across teams
Creative projects often involve many cooks. And that’s great! We love collaboration. But there needs to be a clear process in place, from start to finish.
A structured creative workflow gives everyone a shared understanding of:
- Where a project is in the pipeline
- Who’s responsible for what
- When feedback is needed
- How to communicate changes
So, instead of chasing updates or trying to interpret vague Slack messages, everyone stays aligned and works towards a shared goal.
6. Higher-quality creative output
This is the big one. With a reliable workflow, your team will spend less time caught in the weeds so they can actually put their energy into delivering the best quality work. It’s as simple as that, really!
How to build a creative workflow management process
I think we can safely say that there are many reasons why one might want to implement a creative workflow in your future projects (psst, they’re in the previous section). But here’s the cherry on top: It’s actually pretty easy to build a solid creative process, especially with the step-by-step guide I’ve shared down below.
So let’s take a closer look at how to build a creative workflow process.
Step 1: Define your goals and requirements
Before you start implementing steps and structures, you need to take the time to understand what your creative team is trying to accomplish. This will help you stay focused and track progress, even when the workload gets a bit wild.
To define your goals and gather requirements, ask questions like:
- What type(s) of creative projects do we produce (project scope)?
- What challenges are we currently experiencing?
- Who are the key stakeholders and contributors?
- What tasks can we standardize or simplify?
The main objective here is to identify pain points, like inconsistent feedback, unclear ownership, or slow approvals. Then, you can design a workflow that helps your team succeed.
Step 2: Map the stages of your creative process
Once you understand what your team needs, you’re ready to outline the stages of your workflow from intake to delivery. It doesn’t need to be complex. Just start with a simple structure or project template that covers the key elements, and you can refine it as needed.
As an example, outline your key phases, like:
- Ideation
- Production
- Review
Then, you can build out the specific creative tasks that go into each key phase. Just make sure each task in your workflow has a clear purpose, assigned roles (see Step 3), and an expected timeline. That’s the foundation of successful creative project management.
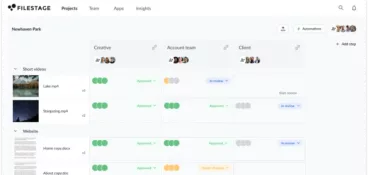
Tip: By mapping the stages visually, with diagrams, boards, or workflow software, you make it easier for teams to understand the big picture.
Here’s how that looks in Filestage.
Step 3: Define roles, responsibilities, and decision rights
One of the most common causes of creative workflow fails is unclear ownership. Luckily, it’s also one of the easiest issues to fix.
The solution? Don’t leave an inch of room for uncertainty when it comes to who does what, and who has the authority to approve or reject work. I recommend using a workflow management tool to automate workflows and help everyone stay on top of new project requests.
Roles typically include:
- Creative project manager
- Strategist
- Creative lead
- Designers, writers, or producers
- Reviewers (marketing, product, brand, legal, etc.)
- Final approver
Decision rights should also be documented. For example:
- Who approves the creative concept?
- Who signs off on compliance?
- Who decides when a project is ready to go live?
This step really boils down to having good communication. Make sure everyone knows what’s expected, and give your team the space to highlight any issues or blockers that could get in the way of their progress.
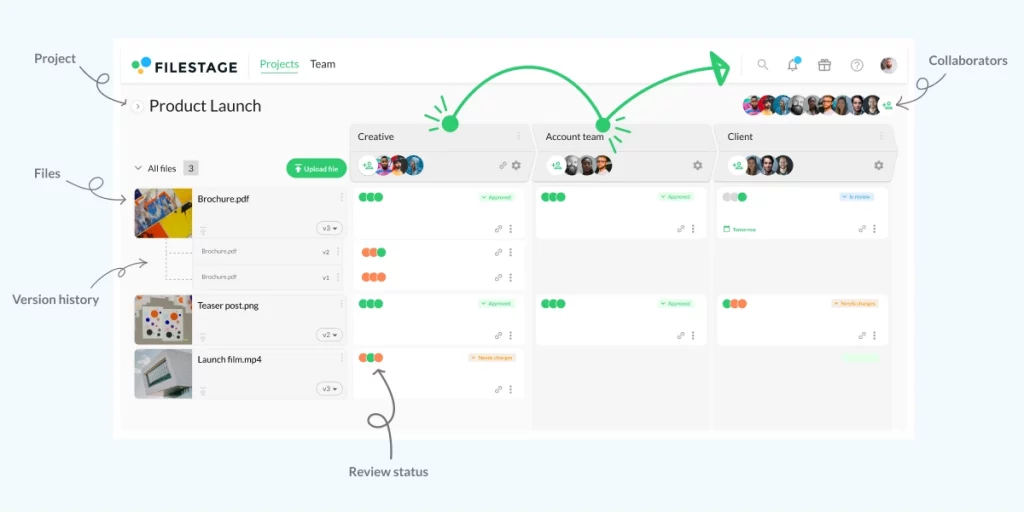
Step 4: Set up clear review and approval processes with Filestage
If you don’t want to see all your hard work go down the drain, your creative team needs a proper review and approval process. And for that, you need Filestage.
Filestage is a review tool that makes managing feedback easier for everyone. It helps you share, discuss, and approve all your files, all in one place. So if you’re used to jumping between different platforms for creative reviews, you’re about to save some serious time when you start your free trial wink wink.
Your project managers can integrate Filestage with project management software like Asana, ClickUp, and Monday.com for smoother project management across your entire workflow and creative production process.
Here’s how it works:
- Upload your files and add a due date
- Invite your reviewers or send them a link (they don’t need an account)
- Let reviewers add their feedback and discuss ideas in the comments
- Turn the comments into a to-do list so you can tick off edits for the next version
- Upload the new version to Filestage
You can take a 60-second Filestage tour below.
Supercharge your creative workflow
Share content, get feedback, and manage approvals all in one place with Filestage.
Step 5: Select and integrate your creative workflow software
Technology is your best friend when it comes to managing a creative workflow efficiently. So it’s important to pick a few tools that integrate smoothly and support transparency, collaboration, and overall creative production.
Common tools include:
- Project management software (like Asana, Monday.com)
- Review and approval tools (like Filestage)
- Creative asset management systems (like Dropbox, Google Drive, DAM platforms)
- Communication tools (like Slack, Teams)
- Creative production tools (e.g., Adobe Creative Cloud, Figma)
The goal is to ensure your tools form a seamless ecosystem where assets, feedback, and project updates flow naturally. All while cutting back on repetitive tasks.
Tip: You can have too much of a good thing when it comes to creative workflow tools. So, make sure you only select the right creative workflow software for your creative operations. No more, no less.
Step 6: Test, optimize, and standardize
You never truly know how effective your creative workflow is until you test it with your team members. Ideally, you want to do this in a low-stakes setting.
Roll out your workflow with a pilot project, or choose a real project where time is on your side. Observe how the team uses it, gather feedback, and refine the structure.
You might want to create a quick survey to evaluate if:
- Stakeholders are clear on their responsibilities
- Review rounds are moving smoothly
- Tools can be used consistently
- Deadlines are being met more reliably
Once refined, you can standardize the workflow by documenting it in a playbook or process guide. Some extra training sessions can help embed the workflow into the team’s habits.

Example of a structured creative workflow
Now it’s time to see how a creative workflow could come to life. I’ve prepared a quick example workflow that outlines the key phases, with a set of tasks within each stage.
1. Intake and briefing
- Gather all requirements, objectives, and constraints
- Identify target audience, key messages, and success criteria
- Clarify timelines, deliverables, and stakeholders
- Collect reference materials or prior work
- Confirm the brief and document expectations
2. Ideation and concept development
- Conduct research and gather creative insights
- Brainstorm multiple ideas or directions
- Develop initial sketches, outlines, or conceptual frameworks
- Evaluate concepts based on feasibility and alignment with the brief
- Select preferred concept(s) for development
3. Content production
- Create the draft, prototype, or working version
- Build assets (copy, visuals, layouts, audio, video)
- Integrate branding, tone, and technical requirements
- Iterate internally until a cohesive version is ready for review
4. Review and approval
- Share content with stakeholders for feedback
- Track revisions, comments, and required changes
- Implement edits and resolve open questions
- Secure final approval from all necessary parties
5. Finalization and delivery
- Apply final polish (formatting, quality control, proofreading)
Export files in required formats - Package deliverables (assets, documentation, usage guidelines)
- Deliver via agreed-upon channels
6. Tracking and archiving
- Log project performance, feedback, and outcomes
- Archive final files, source files, and documentation
- Note learnings and efficiency improvements
- Monitor impact or performance metrics (if applicable)
Nail every creative project with creative workflow management
Structure and creativity are the power couple of marketing. With a solid workflow in place, you protect your creative team’s time, sharpen your processes, and make space for bigger, better ideas.
I hope this article helps you deliver your best creative work with confidence. And if you’d like to see how Filestage can help you reach final approval faster, start your free trial today.