Creative asset management is something all creative teams struggle with. Whether you’re a brand coordinating multiple campaigns or an agency juggling countless client projects, the sheer volume of creative assets you have to manage can quickly feel overwhelming.
From images, videos, and graphics to documents, designs, and templates, it can quite literally feel like you’ve got creative assets coming out of your eyeballs.
Without a clear system in place, it’s hard to keep track of everything. And I don’t just mean knowing where all your assets are – you also need to be able to identify the latest versions and make sure outdated assets don’t accidentally resurface.
But fear not. Here are 10 creative asset management tips to help you stay on top of it all.
Let’s dive in.
1. Centralize your assets
When you have files scattered across different platforms and saved to different devices, managing and locating specific assets can be nothing short of a nightmare. Even for the most organized creative professionals.
The solution? Use a digital asset management (DAM) system to neatly store and organize all creative assets in one centralized location.
By safely storing all your creative assets in one place, you make it easy for all team members and stakeholders to find and access the correct files. This paves the way for better collaboration, greater consistency across projects, and a reduced chance of digital assets being lost, misplaced, or misused.
What’s more, it’s a scalable solution. As your business grows and your asset library expands, your digital asset management software will keep up with you, keeping your processes efficient and effective – no matter how fast and far you scale!
Approve all your content in one place
Get quick and clear feedback right on top of your assets with Filestage.
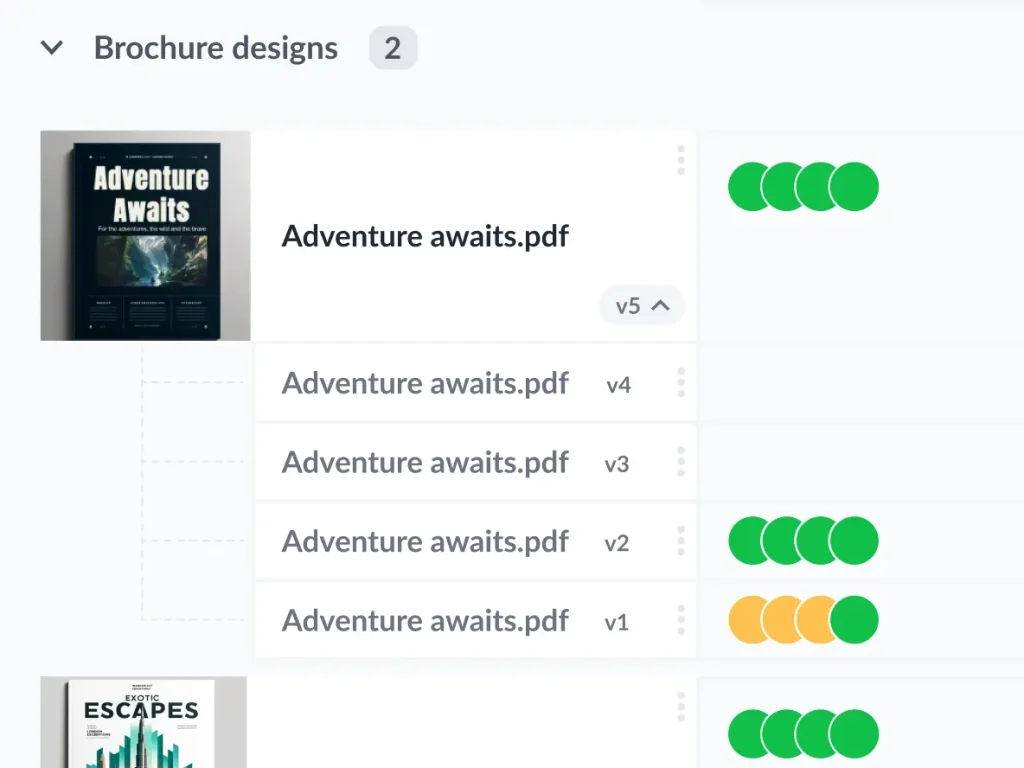
2. Use consistent naming conventions for file versions
Setting up standardized naming conventions for file versions is one of the best things you can do when it comes to creative asset management. This makes it easy for everyone to find and identify the latest version of a file using the search feature.
Without a consistent naming convention, you quickly end up with five files that look like this:
- Design Name v5
- Design_Name_final version_2
- Design-Name-final-final
- Design-name_final-v3
- Design-name_FINALFINALFINAL
Which one is the latest version? Which files are out of date? Get these answers wrong and you’ll realize too late that you’ve been working with the wrong file. Maybe you’ve even published it!
There are a few key rules here:
- Use the same file name for the whole lifespan of the creative file
- Use the same characters to separate words in the file name (be it spaces, dashes, and underscores)
- Use a consistent suffix to indicate the version number of the file (v1, v2, and so on)
- Make sure the entire team knows the correct format going forward
And a bonus rule: never, ever, use the suffix “_final” in any way, shape, or form. You’ll only be setting yourself up for disappointment. Before you know it you’ll be working on “_final-final3-REALLYFINAL” and wondering where it all went wrong.
With Filestage, this is done for you. Filestage automatically stacks your versions so everyone knows which one is the latest. And if anyone opens an old version by mistake, a message pops up to let them know.
3. Use metadata to avoid copyright issues
Metadata – which includes keywords, categories, creator names, and project details – is super-handy when it comes to searching for specific creative assets. And it’s just as important when it comes to compliance.
Tag your creative assets with relevant copyright information as well as details about licensing, expiration dates, and usage restrictions to avoid any legal trouble. That way, you can make sure all your creative assets are used in a way that’s fully above board, keeping your organization safe and compliant.
4. Make sure your assets are approved before they’re uploaded
Before uploading any creative assets, make sure they’re fully approved by the relevant stakeholders. This keeps your library free from clutter – no half-finished drafts here thank you very much! That means everyone with access can use files safely in the knowledge that they’re all approved and ready to use.
To get here, use a review and approval tool like Filestage to set up a clear approval process. You can define different reviewer groups for amending and finalizing assets before they’re uploaded and distributed.
Review and approval is an essential part of the creative process, so it pays to get a robust approval process in place.
Here’s an example approval process for creative assets:
- Share your work with reviewers
- Collect feedback
- Create and share the next version
- Repeat the process until you get approval from everyone
Once each asset has received the green light for quality, relevance, and brand consistency, upload it to your asset library, et voila!

Approve all your content in one place
Get quick and clear feedback right on top of your assets with Filestage.
5. Use data and analytics to measure impact
Harness the power of data and analytics to evaluate how specific assets are being used and how well they perform across campaigns.
Metrics like views, downloads, and engagement can help you make data-driven decisions for future content and digital marketing campaigns.
For example, if you find that video content tends to perform best, you can focus on video going forward. If creative content from one particular content creator always comes up top, you can prioritize them for future content.
You can also use insights to uncover which assets aren’t pulling their weight and to decide which assets need to be updated or replaced.
6. Set expiry dates for campaign-specific assets
Another top tip for managing your creative assets is to set expiry dates for anything tied to specific campaigns. By doing that, you prevent assets from being misused in the future – whether that’s because they contain discontinued products or due to their creative licence expiring.
For example, I once used a photo in an article, only to later receive an email from the photographer explaining that the rights had expired. It was an awkward situation that could have been avoided with a simple expiry reminder. By setting expiry dates, you can save time and effort, and avoid these kinds of legal and logistical headaches going forward.
7. Carry out regular audits
Take the time to regularly review and audit your creative asset library to keep it up-to-date and clutter-free. This includes checking for outdated or duplicate content, removing any digital assets that are no longer needed, and making sure everything complies with current legal and brand standards.
Staying on top of these audits means your creative asset library continues to be a reliable resource for your team and stakeholders. This way, everyone has access to the best materials and the most up-to-date versions.
8. Set clear access permissions and user roles
When you regularly work with a wide range of stakeholders, there’s always the risk of content getting into the wrong hands or being edited without permission. Setting clear access permissions and allowing authorized users to view, edit, or download certain assets keeps your materials safe and secure.
For example, you might give internal and external teams different permissions and user roles.
This not only protects sensitive content but also prevents unauthorized access and alterations. This keeps your creative assets secure and allows all stakeholders to perform their tasks without overstepping boundaries.
9. Train your team to use your asset management software
To get the most out of your creative asset management platform, it’s important to provide training for your team on how to use it. Cover all the basics of uploading, tagging, and retrieving creative assets, plus advanced features like workflow automation and version control.
The better your team understands the software, the better equipped they’ll be to use it independently and effectively.
10. Integrate your asset management software with other tools
To get the most out of your digital asset management software, explore its integration potential with other tools. By integrating it with other software in your arsenal you’re streamlining creative workflows and allowing data to flow smoothly between systems. No manual input required.
For example, integrating with Filestage streamlines the review and approval process, allowing team members to provide feedback and approve creative assets directly within your chosen platform. Seamless!
Final thoughts
And there you have it – 10 creative asset management tips to help you take full control of your asset library. With the right software, thoughtful organization, and regular housekeeping, you can keep on top of all those brilliant creative assets.Plus, you can streamline your creative workflows, and make sure your team is always working with the best, most up-to-date materials.
If you’d like to see for yourself how Filestage can help you collect feedback and get approval on your creative assets, start a free trial here →