TL;DR
- A design approval process is a structured workflow used to review designs, collect feedback, and secure final sign-off before publishing.
- Without clear structure, feedback becomes scattered, reviewers conflict, and projects stall while teams wait for responses.
- The typical design approval process includes sharing the first draft, collecting feedback, revising the design, and repeating the cycle until approval.
- Clear roles, defined review stages, and version control help teams avoid confusion and reduce unnecessary revision cycles.
- Design approval software like Filestage centralizes feedback, tracks versions, and helps teams move designs through approvals faster.
Introduction
Whether you’re a designer, a creative director, or a project manager, design approval can be a tricky and time consuming process. Multiple stakeholders. Multiple rounds of feedback. Multiple communication channels. Plenty of opportunities for hold ups and missed deadlines.
But with an effective design approval process in place, those pain points can become virtually non-existent. And the right design approval software can make things even easier.
Sounds appealing? Thought it might.
Use this guide to help you build an effective design approval process, accelerating sign-off and ensuring you hit every deadline thrown at you.
What is a design approval process?
A design approval process is a structured workflow used to review designs, collect stakeholder feedback, implement revisions, and obtain final sign-off before a project is published or launched. Whether you’re working on designs for a webpage, a social media ad, new packaging, or even just presentation slides, an effective and well-planned approach streamlines the process and makes getting proof approval a breeze.
The design approval process is crucial for ensuring that designs meet specific business goals and user needs before they move to production.
Approval processes usually look like this:
- You submit the first draft
- Reviewers give their feedback and either request changes, reject, or approve the file
- The designer makes any requested changes and resubmits the design
- This process repeats until all stakeholders have given their sign-off
In practice, the approval workflow supports the wider design process, guiding a concept and early ideas through review until the final design work receives approval.
See how Filestage can speed up your approvals
Enjoy a free, 30 minute consultation with our experts, tailored to your team and use cases.
Common challenges in the design approval process
Even the most experienced teams can struggle to keep design approvals running smoothly. Without a clear structure, feedback can become scattered and projects stall while people wait for responses.
Some of the most common challenges include:
Scattered feedback
Comments arrive through email, chat messages, meetings, and shared documents. Designers then need to gather and interpret feedback from several places, which often leads to crossed wires and teams struggling to stay on the same page.
Too many reviewers
Large projects often involve multiple departments. Without clear structure, feedback can become contradictory. When several decision-makers review the same design, disagreements about aesthetics, functionality, or brand representation can easily slow down the approval process.
Version confusion
When files are shared manually, reviewers may comment on outdated versions of the design. This can lead to unnecessary multiple iterations, longer revision cycles, and other potential issues.
Unclear approval responsibilities
Sometimes it’s not clear who has final authority to approve a design. Teams may wait for feedback that never arrives.
Delayed responses
Busy stakeholders often postpone reviews unless deadlines are clearly defined, which can put project deadlines at risk. Continuous revisions without clear direction can lead to frustration and fatigue for both designers and stakeholders.
These challenges are exactly why structured approval workflows help creative teams stay organized.
The four-step design approval process
Let’s take a look at those four steps in more detail.
1. Share your designs with your reviewers
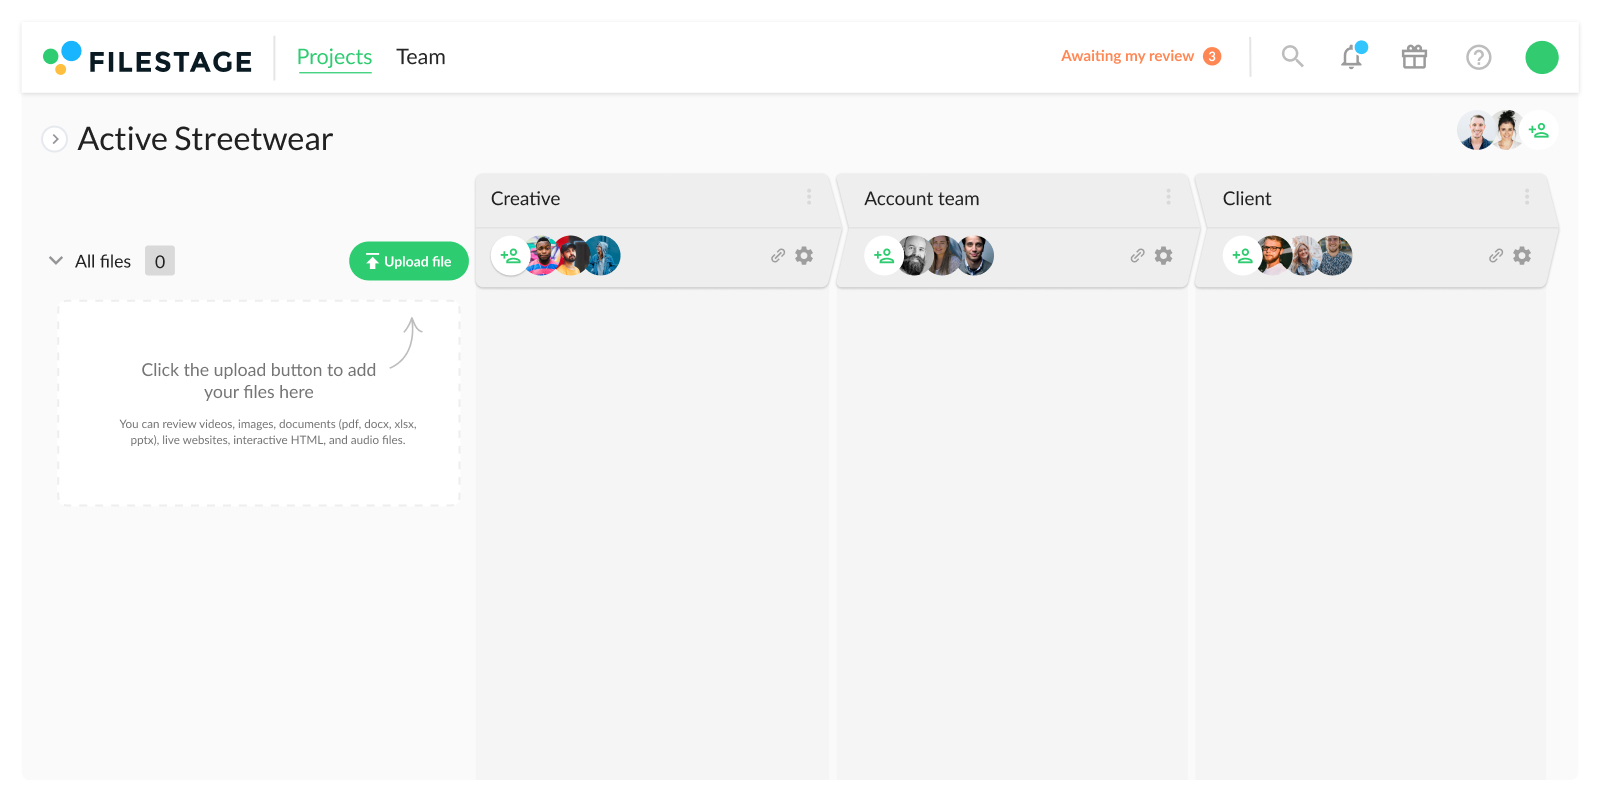
The first step of the design approval process is to share your first draft with the review team and the specified department supervisor. Many teams start this stage by sending an approval request form or an approval request outlining the specified requirements for the review.
Make sure you know exactly who needs to be involved in the process before you do so – different businesses and projects will require different stakeholders to get involved at different stages.
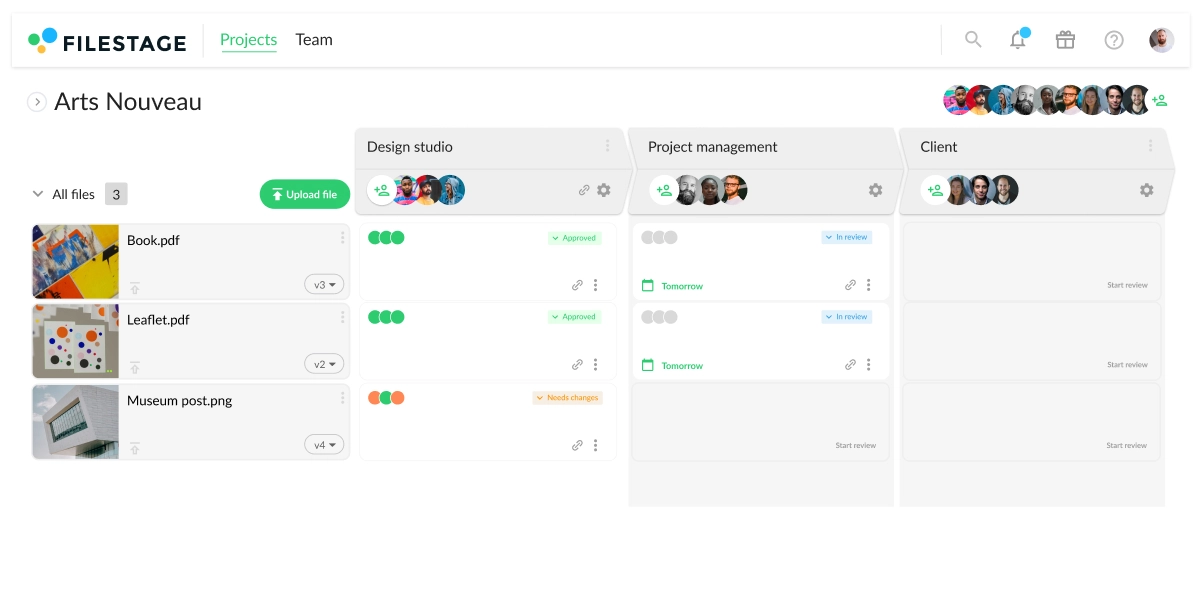
Once you create an approval request form, you can share your designs via email, or you can use a specific review and approval platform like Filestage to make the design review process more efficient.
Less time chasing feedback, more time on creative strategy
Online proofing software can cut review cycles by 30%, freeing up time for high-stakes work. Read our guide to see if it’s the right solution for your team.
2. Collect feedback and discuss improvements
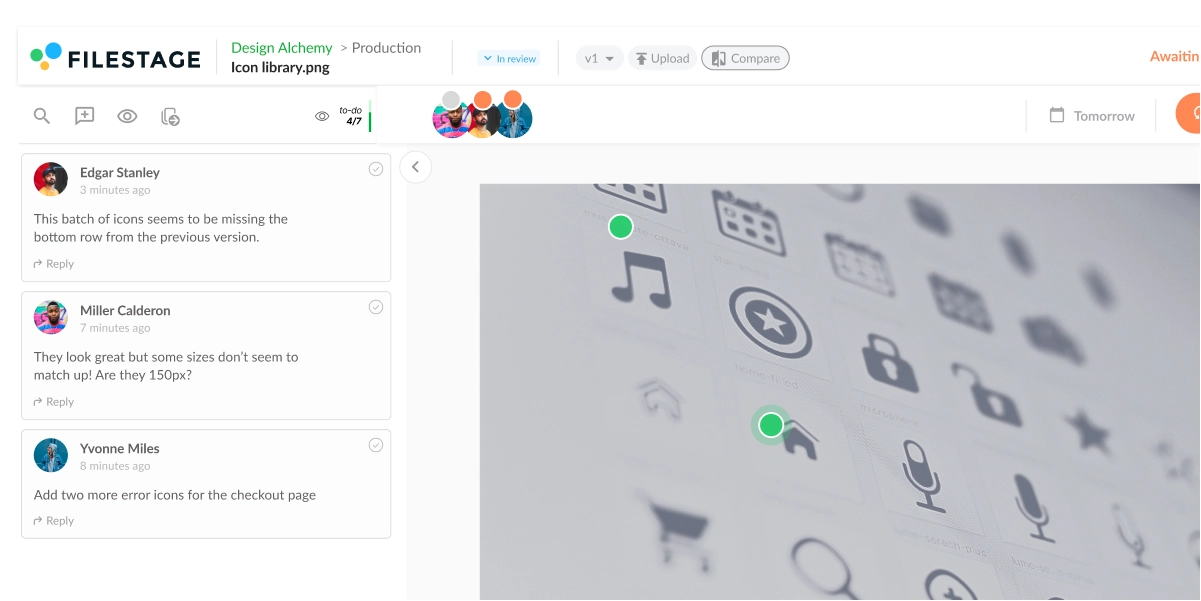
Collect feedback from your reviewers using email or, better yet, a specialist design feedback tool. When you create an approval request via email, there can be crossed wires, multiple email chains, missed amend requests, and altogether a bit of a mess.
But with online proofing tools for graphic designers, like Filestage that have been specifically designed to help you collate feedback, life gets that bit easier. You can even get feedback on websites!
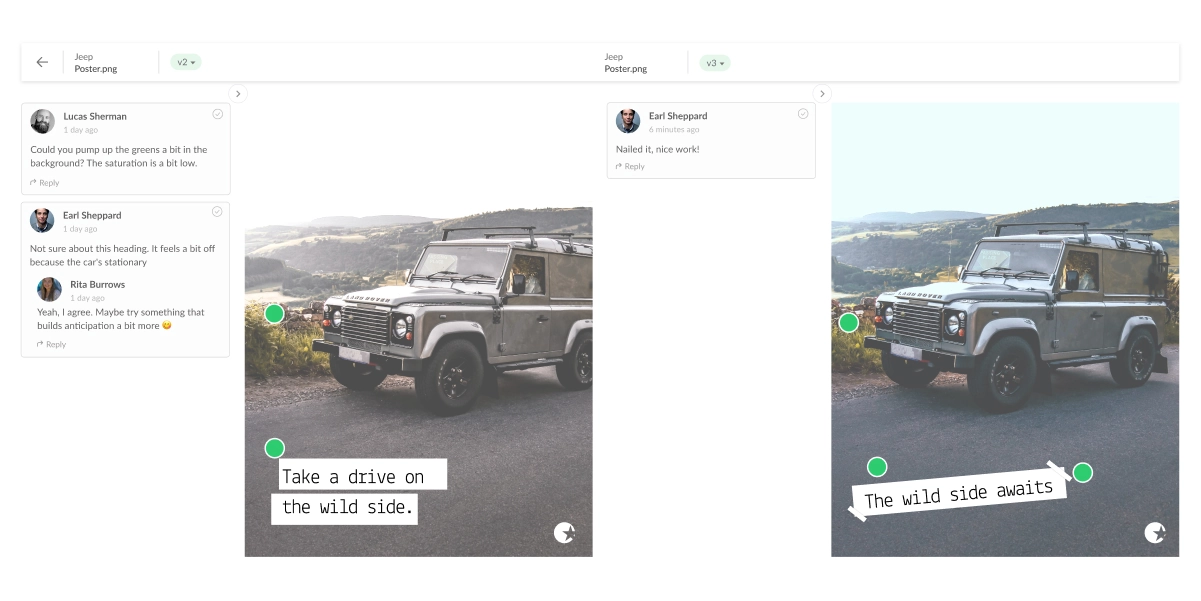
Your direct department supervisor and other reviewers can open the file in their browser and leave comments and annotations for everyone else in the process to see in real time. They can discuss the feedback amongst themselves there and then, resolving any conflicts so that you know exactly what amends need to be made. Reviewers can also tag specific team members, making sure the right team members respond quickly, even when clients are involved.

“Filestage saves our company a huge amount of time. Instead of writing detailed instructions over email, reviewers can just click on a file to add comments in context. This makes everything faster – from giving feedback, to managing the process, to making edits before sharing the next version.”
Karina Berner, Creative Production Specialist at Sartorius
3. Create and share the next version
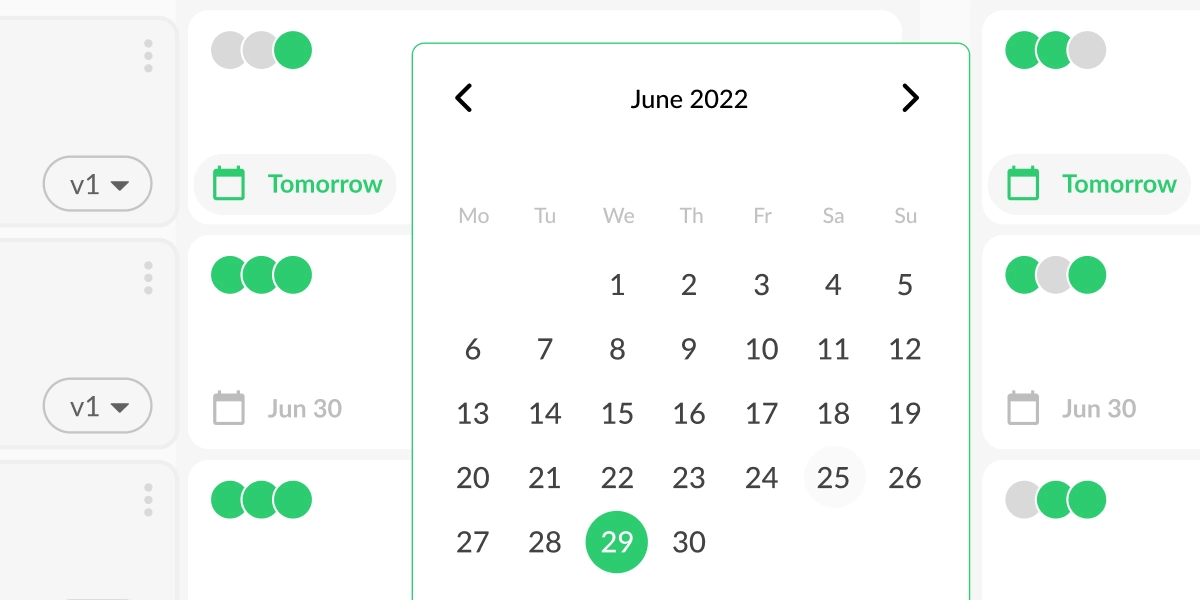
After reviewers have submitted their feedback and all questions have been clarified, you – or the relevant editor – can implement the changes. A review and approval tool makes this step easier by displaying all the comments in one place. Tick them off as you go along so that you know that every suggestion has been actioned. And with built-in version control for your designs, you can easily track revisions and see when a major change has been introduced.
4. Repeat until you get approval
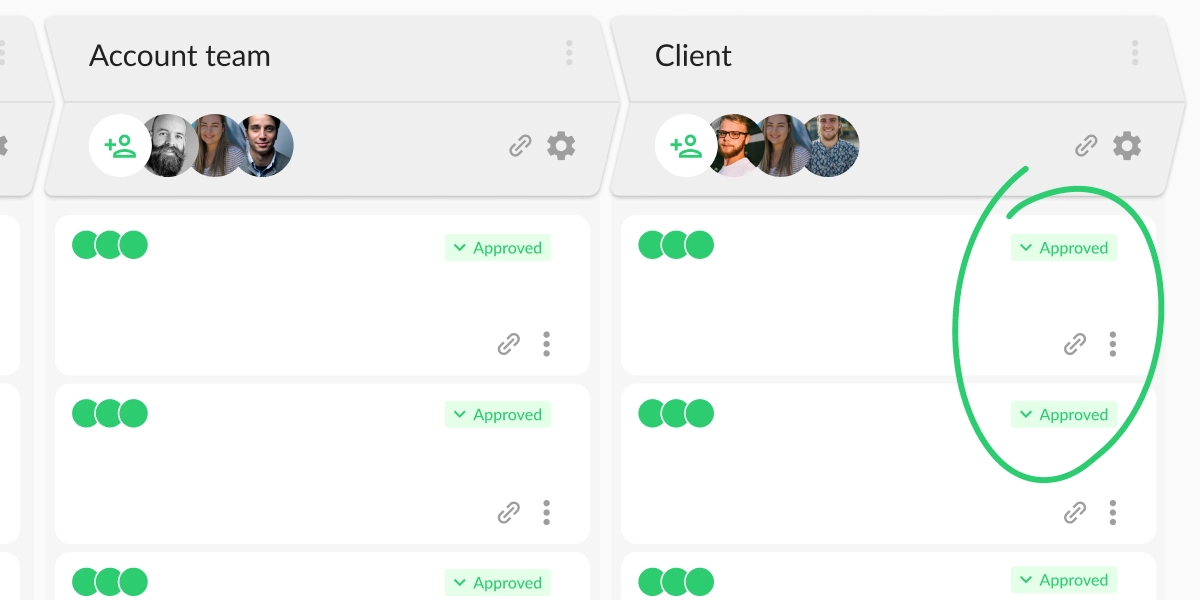
Repeat steps two and three until you’ve got approval from every stakeholder. Design approval software helps you to keep track of who has provided sign-off, and who you’re still waiting for. Once every stakeholder has signed off, the design is approved and gets the green light to move to the next stage!
See how Filestage can speed up your approvals
Enjoy a free, 30 minute consultation with our experts, tailored to your team and use cases.
Seven best practices to streamline the design approval process
Now that you know the relevant steps, let’s take a look at best practices that help streamline the process and bring more organization to creative reviews.
1. Define who will be involved in your design approval process upfront
Like I said earlier, every business will have different stakeholders that need to be involved in the approval process. Who these people are will vary from business to business and from project to project. Here’s an example of who might need to be involved in the multi step approval process:
- Team lead
- Creative director
- Marketing team
- Brand manager
- Legal team
- Higher management
- Client (and all of the above on the client side)
Make sure you know from the offset who needs to be involved and when.
Depending on the size and scope of the project, you might want to break the approval process down into steps, with different stakeholders involved at each stage. This will help you design flexible approval processes while collecting all important approvals.
2. Set due dates to make sure your designs get approved on time
Gathering approval from various stakeholders can be time-consuming and frustrating, especially if you have to waste precious time chasing people who haven’t got back to you.
Setting a due date for every review step means that reviewers have a deadline to work towards, helping them to prioritize their work. And when you receive feedback and approval on time, you’ll meet your project deadlines with less stress.
With Filestage, you can add due dates to your files to keep your projects on track. We’ll send a reminder to any reviewers who still need to take a look, taking the chasing and pestering part of your job away from you.
3. Give reviewers a centralized place to share feedback
This is where specialist design feedback tools really prove their worth. Collating feedback all in one centralized place – rather than in dribs and drabs via various email chains – makes life easier not only for you, but for your reviewers too.
With Filestage, reviewers can leave comments, annotate your designs, and tag specific team members. They can clearly see what others are saying, discuss feedback and any disagreements, and iron out any conflicting opinions there and then.
And once they’re ready, you’ll have a clearly defined set of edits to make that you can turn into a to-do list and work through before sending your reviewers the next version.
4. Break approvals into stages
Depending on the size and scope of the project, it can help to split the approval process into several stages.
For example, a design might first go through an internal review with the creative team before being shared with marketing, legal, or external stakeholders. A staged approach like this keeps feedback focused and prevents too many people reviewing the same draft at the same time.
It also reduces the risk of conflicting feedback and helps designers address comments in a logical order.
5. Encourage clear and actionable feedback
Vague feedback often slows down the design approval process. Comments like “this doesn’t feel right” or “can we try something different?” leave designers guessing what changes are actually needed.
Encourage reviewers to explain what should change and why. For example, instead of saying a section feels unclear, a reviewer might suggest adjusting the headline or improving the call-to-action placement. Or your feedback might highlight when a design doesn’t follow your brand guidelines, such as incorrect colors, typography, or layout choices.
This kind of specific feedback helps designers implement changes more quickly and reduces the number of revision rounds.
6. Track versions with version control
As designs move through multiple review rounds, keeping track of different versions becomes essential.
Without version control, reviewers may accidentally comment on outdated files or request changes that have already been addressed. This creates unnecessary confusion and extra work for the designer.
Using a review platform with version tracking allows stakeholders to compare revisions and see exactly what has changed between drafts.
7. Use tools designed for design reviews
General communication tools can make design approvals difficult to manage. Feedback often becomes scattered across email threads, chat messages, and meeting notes.
Specialist design review tools bring everything together in one place. Reviewers can comment directly on the design, discuss changes with other stakeholders, and clearly indicate when they approve the final version.
This makes it much easier for teams to track feedback, implement revisions, and move projects toward approval.
FAQ
Why is the design approval process important?
The design approval process is important as it helps you to finish projects faster and meet deadlines. Not only that, but your final designs will be the highest possible quality, since an array of stakeholders will have scrutinized your work and provided their feedback.
How do you ask for design approval?
Once you know exactly who you need to get approval from, you can send them an email. Give context about the project, attach the file, let them know what you need from them, and set a deadline.
Alternatively, you can share your request for approval through Filestage. Add them as a reviewer and send them an email via our platform, which will include a link to the design that needs reviewing.
Find out more about how to ask for approval.
Who’s involved in the design approval process?
This varies between businesses and projects, but the following stakeholders might be involved in the approval processes:
– Designer
– Project manager
– Team lead
– Creative director
– Marketing team
– Brand manager
– Legal team
– Higher management
– Client (and all of the above client side)
Make sure you’re clear on exactly who needs to be involved before you start collecting feedback.
What slows down the design approval process?
Common causes include scattered feedback across tools, unclear approval responsibilities, outdated file versions, and delayed responses from reviewers.
How long should a design approval process take?
Many teams aim to complete a review cycle within 24–72 hours. The exact timeline generally depends on the number of stakeholders and the complexity of the design.
Final thoughts
An effective design approval process can help you to collect feedback, secure approvals, and meet deadlines with less stress. Instead of chasing comments across multiple communication channels or dealing with conflicting feedback, your team can follow a clear workflow that keeps everyone aligned from the first draft to the final version.
With the right structure in place, reviewers know when to give feedback, designers know exactly what needs to change, and projects move forward without confusion or missed deadlines. The result is a smoother design process, faster approvals, and more time to focus on creative work that delivers results.
If you’d like to see for yourself how Filestage could help as part of your design approval process, you can start a free trial here →