Online videos are massive. Today, 91.8% of internet users watch digital videos every week. So it’s no wonder online videos are part of your marketing strategy. I mean, that’s why you’re here, right?
Whether you’re working on a TV ad or YouTube videos, there will be a point when you need to collect feedback from one or more stakeholders. And that’s where video annotation tools come in.
These tools let you:
- Upload videos online and share them with stakeholders
- Watch the videos in your browser or download them to your desktop
- Add drawings, lines, and other annotations
- Write text comments alongside the videos in a shared and collaborative space
On top of that, some video review and approval software even lets you manage your video versions and track approvals from your reviewers.
But before we get into how to draw on video content using these tools, let’s look at why annotation is so important.
Sharing video feedback by email is painfully slow and prone to errors
Giving feedback on videos has never been easy. But now that around 18% of people work from home (compared to 6% in 2019), it’s even harder. And with prominent video content blowing up on YouTube and other social media platforms, collecting feedback on videos is more important than ever.
You can’t gather everyone around your screen to watch a video and talk it through. So instead, you host it online, share a link with your stakeholders, and let chaos ensue!
Here are a few problems stakeholders face when giving feedback by email:
- Writing out timecodes and capturing screenshots to try to create context
- Writing essay-like explanations to illustrate what they want changed
- Scrolling back through email chains to make sense of what other people have said
- Duplicating other people’s comments so they can add to their points
All of this adds up to a lot of wasted time on all sides, and a lot of room for mistakes!
How to draw on video to share collaborative feedback
Time stamping, bookmarking, annotating … yawn. Honestly, we can’t think of a world where editing videos for feedback isn’t possible. It’s fast, intricate, and super efficient.
It’s visually simple for whoever is receiving the feedback. Reviewers can draw on the exact frame, leave time stamps, draw arrows, leave a text box, or circle the amendment. You can add video feedback with a screen recorder, or even add fun graphics with an animation maker.
It’s inherently speedier and easier to digest than matching up time stamps from a different document with written feedback. With draw on video, we can see where the edit is and skip to it!
Use Filestage to draw on videos
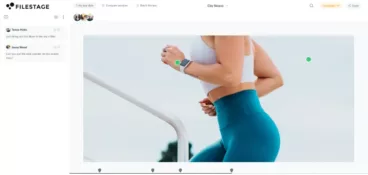
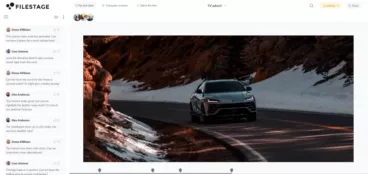
Filestage is a video feedback tool that’s used by brands and agencies to collaborate on videos in the cloud.
You can share videos online and invite an unlimited number of teammates and reviewers to add feedback on top of your videos. All they have to do is tap on the video to create a comments and annotation, then the timecode will be saved automatically.
And when you’re ready to share the next edit, you can upload it as a new version of the same file – keeping everything in context!
Here’s how you can quickly draw on videos with Filestage:
- Sign up for the Free plan of Filestage – you’ll also get to try the Professional plan for seven days.
- When you land in the app, click “Create project” and give it a name.
- From your project dashboard, click “Upload file” and add one or more videos to your project. (Note, you can also use Filestage to share designs, websites, and other file types.)
- Click on your video to open it in the file viewer, then tap on any part of the video to create a marker and add a comment and annotation.
Pros: Filestage is a complete review and approval tool that helps you manage video content in a consistent, organized, and collaborative workflow. It also integrates with Adobe Premiere Pro, so everyone’s feedback can be pulled directly into the edit sequence.
Cons: If you’re interested in more advanced features like comparing video versions side by side or creating project templates, you’ll need to upgrade to a paid plan.
Supercharge your video review rounds
See how Sharp, Sixt, and GroupM make video feedback quick and easy for everyone.
Use Microsoft Photos to draw on videos
Microsoft Photos is an in-house video editor that’s automatically installed on all Windows devices. A far cry from the perils of Windows Movie Maker, Photos boasts an easy-to-use interface with a plethora of editing and drawing tools to customize your videos – whatever they’re for.
It’s an ideal choice for creating tutorials or other educational content like explainers for internal use. You can highlight key points on the screen for extra clarity and visual appeal.
With that, here’s a quick guide on how to use this drawing app for drawing on video:
- Find the video you want to edit on your device, right click, and select ‘Open with Photos’ from the dropdown menu.
- Your video will automatically open in Photos and start playing. When you find the video frame you want to draw on, press the spacebar key or click the pause button to stop it.
- Click ‘Edit and Create’ on the menu bar in the top-right of the screen and select ‘Draw’ from the dropdown box.
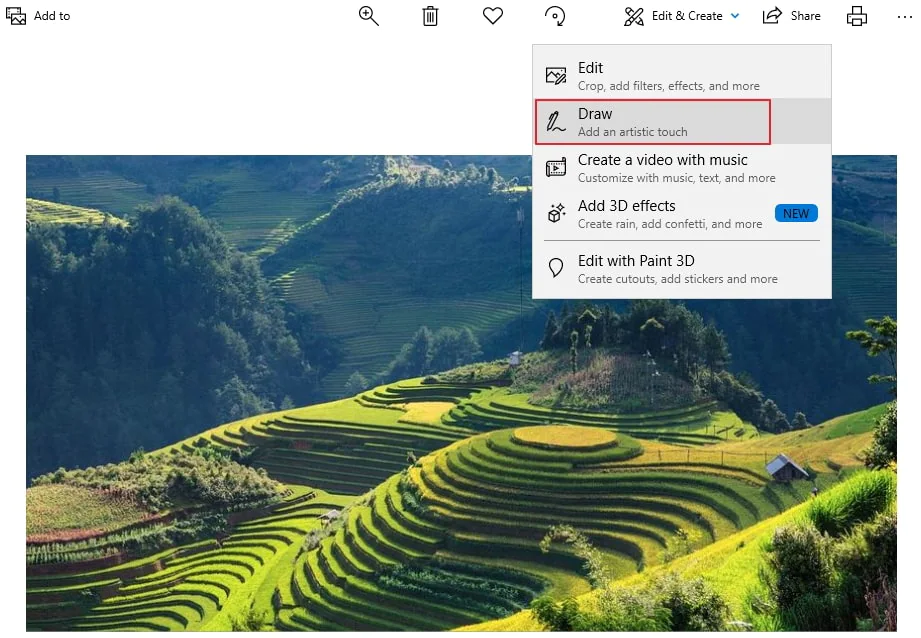
Source: Filmora
- Choose from a ballpoint pen, marker, or highlighter and select the brush color, size, and density.
- Start drawing!
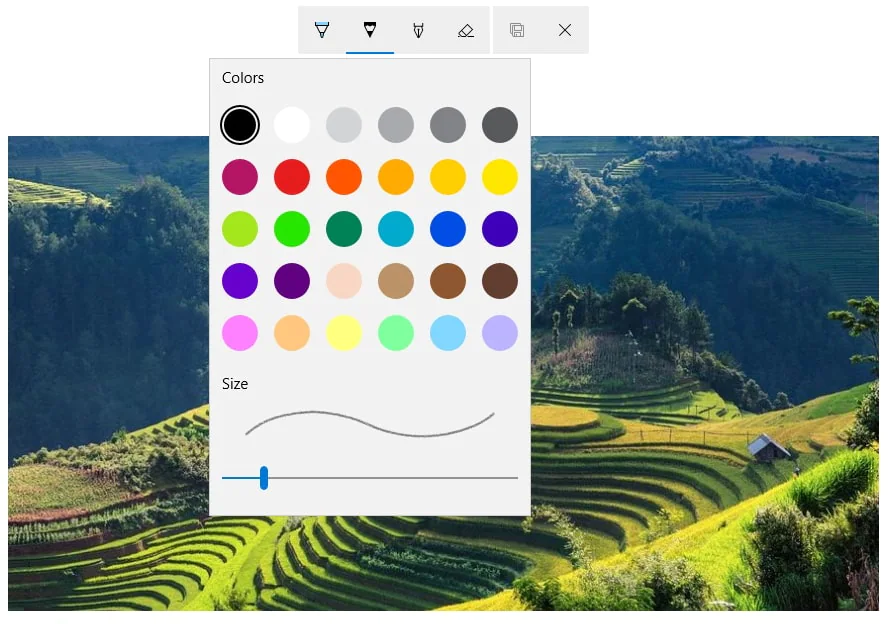
Source: Filmora
- Once you’re finished, save it under ‘File’ in the top-left corner and choose which folder to save it in.
Pros: It’s free, easy to use, and comes readily available on your Windows device.
Cons: It can be quite fiddly for a beginner. There’s lots of clicking admin required which can become quite complicated at times.
Use iMovie to draw on videos

Just like Microsoft Photos for Windows, iMovie is the built-in tool for the Apple ecosystem that lets you edit videos with ease. And, best of all, it’s free!
Here’s how you can use it to draw on video:
- Open a copy of any random photo in preview. Create a .png image by clicking Edit/Select All and an Edit/Delete.
- Select ‘convert to .png’ from the pop up box and a blank image will appear on screen.
- Click Tools/Annotations/Line from the Preview menu. This will bring up a screen with a straight line which you can edit or delete.
- Browse the toolbar at the top, select your drawing tool and get creative.
- Once you’re happy with your drawings, save the image to your desktop and drag it into your iMovie video project. Place it above your chosen frame in the timeline and drop it on.
There you have it!
Pros: It’s super high quality, and unlike its Adobe Premiere Pro and Final Cut Pro counterparts, it’s free and downloadable across all Apple products.
Cons: You can’t use it outside of Apple devices, which is a shame considering it’s so high-performing. It’s not the most user-friendly, either. As you can see above, even in its most concise form, the steps are still quite complicated for beginners.
Use Video Painter to draw on video on mobile
Source: Google
Look, we’re not saying you’ve left it until the last minute, but we’re just saying that Video Painter is here to aid drawing on video on a mobile device just in case you’re on the go.
Video Painter doesn’t compromise on quality, so you can add as many drawings in as you like with these steps:
- Download Video Painter from the Play Store or App Store.
- Open the app and select your desired video from your phone’s photos app.
- Add your drawings into any frame you want. Video Painter offers video editing software such as freehand, shapes, and text. You can even add music if you want to.
- Save your edited video as a new file to your phone, and upload it to your preferred device.
Pros: It’s easy to draw on, share, and upload video content. You can finesse your work with the preview option so you can watch your final video before saving. Plus, you can draw freehand sketches. The touch-friendly interface makes it the best free video sharing platform to use on mobile phones and tablets.
Cons: It’s only available to Android mobile users, and the fact that it’s only usable on a mobile device can make it quite difficult to work with.
Three best practices when drawing on videos to share feedback
We’ve already talked about how difficult it can be to share feedback about video files. So here are a few tips and best practices to help you out:
1. Be clear what you’re referencing
Use a tool that lets you add drawings, markers, and annotations right on top of your videos. And if comments are automatically timestamped to the right frame in the video, even better!
Let’s use Filestage as an example. You can add drawings or comments to specific frames so everyone has full context on your feedback.

2. Create a shared space for stakeholders to collaborate
The main issue with email feedback is that nobody pays attention to what anyone else has said. So when choosing your annotation tool, make sure reviewers will be able to see and reply to each other’s comments.
This is easy to do in Filestage. You can simply create a new project and organize stakeholders into the relevant reviewer groups to make sure the right people leave feedback at the right stage of the review process.

3. Share supporting files in context
One of the biggest benefits of Filestage is that you can add attachments to your comments. This helps to keep every file related to your video’s development in context.
- Make sure your feedback is clear and concise. Pop it in a text box, draw an arrow pointing to the amendment, etc.
- Use the handwriting tool to write text on video. With this, you can make edits in the video text, like drawing lines through unneeded words or marking grammatical errors and typos.
- Use imagery to entice engagement and to add a fun and personal touch to increase workflow.
Supercharge your video review rounds
See how Sharp, Sixt, and GroupM make video feedback quick and easy for everyone.
Frequently asked questions

How do I draw on a video with drawing tools?
There are several ways to draw on or mark up a video, depending on your goals. Here’s a quick breakdown of each method and what it’s best for:
- Video editing software – You can use software like CapCut or Adobe Premiere Pro to draw directly on your video file. This is best for adding professional edits to your video content.
- Screen record annotation tools – Tools like Loom or Descript allow you to add arrows and annotations to videos. This is best for UX feedback and video tutorials.
- Online proofing software – These platforms let you leave comments, annotations, and timestamps on video files during the review process. This is best for giving feedback on video assets (these drawings won’t appear on the final version).
Will drawing on videos affect my video quality?
Generally, only trimming will cause your video to lose quality. With the software listed above, drawing on videos will not cause a drop in quality. However, if you wanted to upload your video to a video streaming site like YouTube before sharing with colleagues and clients, you may want to convert your video before uploading to avoid this happening.
Do I need video editing experience to draw on videos?
Not at all. All the apps we’ve listed are really easy to use, even for beginners! With such a huge selection of tools, you can have a play around and get a feel for it before having to annotate. Get to know it and you’ll be confident in no time.
Final thoughts
I hope this article has helped to highlight some of the benefits of drawing on videos to speed up and simplify creative feedback.
If you’d like to see how Filestage can help speed up your video review workflow, try it for free →