
If you’ve ever tried to share video online over email, you’ll know how frustrating it can be. And yet, with 3.5 billion digital video viewers worldwide, good video sharing and collaboration processes are essential.
A typical 30-second video can be as big as 250 MB. But the maximum attachment size for most email clients is 25 MB, making your video 10 times too big. But don’t worry. There are plenty of tricks to help you send large video files, no matter how big your files are.
In this article, we’ll explore the three best ways to send large video files online – from review and approval software to cloud storage tools.
Let’s get into it.
1. Google Drive – best cloud storage provider for sharing video files with teammates
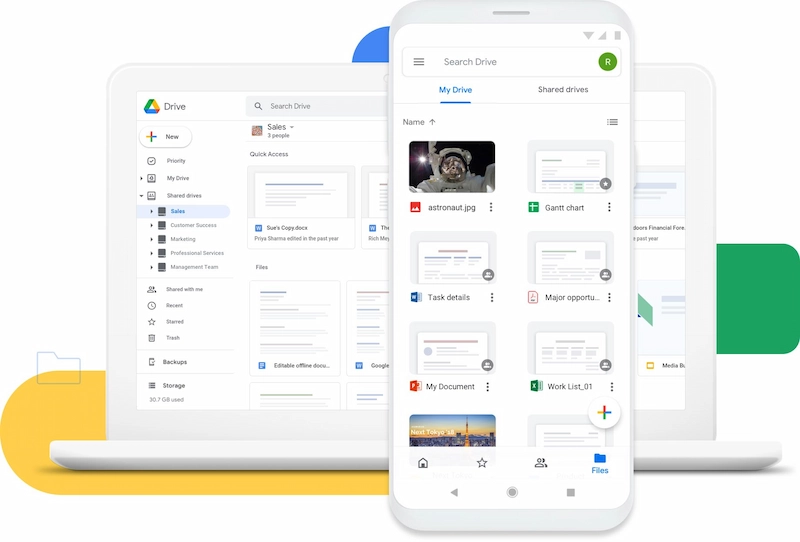
If you need help sending large files over email, Google Drive is a great place to start. It’s a cloud storage solution that helps you share and manage files across your organization. Once your files are saved on your drive, you can access them on any of your devices – including your phone, tablet, or desktop.
It’s popular with everyone from startups and tech companies like Filestage to globally-recognized brands like The North Face.
How to share videos with Google Workspace
Here’s how you share video files using Google Workspace:
- Sign up for a Google Workspace account if you don’t already have one
- Open your Google Drive
- Navigate to the folder you want to upload your videos to
- Drag and drop your videos into the folder
- Right-click on the folder, click “Share”, and enter the email addresses of the people you want to send your videos to
Choose Google Workspace for live document collaboration
If you’re in the business of creating video content, chances are that you need to create documents from time to time too.
From scripts and treatments in Google Docs to budgets and shot lists in Google Sheets, Google Workspace gives you one space to create and manage everything related to your video projects.
Pricing and storage limits
Google’s free account – Google Drive – gives you access to 15 GB of personal file sharing storage. But if you hit the limit or need shared access to your files and folders, you’ll need to upgrade to one of the paid Google Workspace plans:
- Business Starter: $6/user per month – 30 GB file storage
- Business Standard: $12/user per month – 2 TB file storage
- Business Plus: $18/user/month – 5 TB file storage
- Enterprise: Contact sales team – 5 TB file storage
2. WeTransfer – best video upload site for one-off file transfers
WeTransfer has been a popular video upload site for years. You can hop on their website, upload large files up to 3 GB, and then share them by email or transfer link – all in a matter of seconds.
This is a free service that’s hugely popular with people in the creative industries. You can share files online in a couple of clicks, then all your collaborators need to do is hit the download link at the other end. But, in some cases, this is where things fall apart.
If you’ve used WeTransfer in the past, you’ll be very familiar with its major drawback: transfer links time out after seven days. This can cause friction between teammates and clients, making it clear that recipients forgot to download the files and take a look. And in the worst cases – files may even be lost for good! Luckily, WeTransfer has a couple of paid plans to help you get around this issue.
How to share videos with WeTransfer
Here’s how you share video files with WeTransfer:
- Go to WeTransfer’s website and click “I just want to send files” at the bottom
- Click the three dots in the bottom-left corner and choose between “Send email transfer” and “Get transfer link”
- Upload your files and, if sending by email, and the email addresses and a short message
- Hit “Transfer” – and you’re done!
Choose WeTransfer for the simplest way to send large video files
WeTransfer is the only option in this list that lets you upload and transfer files without creating an account. So if you want to send your files fast and aren’t interested in extra features like annotations or document collaboration, it’s probably the best option for you. As long as the maximum file size of 3 GB meets your needs!
Pricing and storage limits
WeTransfer’s free plan gives you a 3 GB transfer limit, but you can of course repeat this as many times as you like for different videos. If you need to send bigger videos, there are two paid plans:
- Starter: $9 per month for individual use only – up to 300 GB per month for sending and receiving
- Ultimate: $26 per month for individual use only – no transfer limit and unlimited storage
- Teams: $22 per user/month – everything in Ultimate, plus up to 25 team members and central billing
3. Filestage – best video sharing site for creative collaboration
Filestage is a video review tool that helps cut content approval time by as much as 30%. You can set up custom workflows with collaborative reviewer groups, making feedback fast, focused, and easy to track.
It’s extremely popular with marketing teams, creative agencies, and video production companies – including Capri-Sun, AB InBev, and Publicis Health.
How to share videos with Filestage
Here’s how you can share videos with Filestage in a few simple steps:
- Sign up to Filestage – this will give you access to a free Professional trial for seven days, then you’ll automatically roll back to the Free plan
- Once you land in the product, click “Create project” and give it a name
- Drag and drop files into your project dashboard, or hit the button in the top-left corner to upload files
- Then share the link with your stakeholders or invite them to your first reviewer group (more on that in a second)
Your stakeholders will then be able to view your videos in their browser without needing to download anything or create an account. And if you upload more content or new versions later, they’ll be able to access everything using the same link!

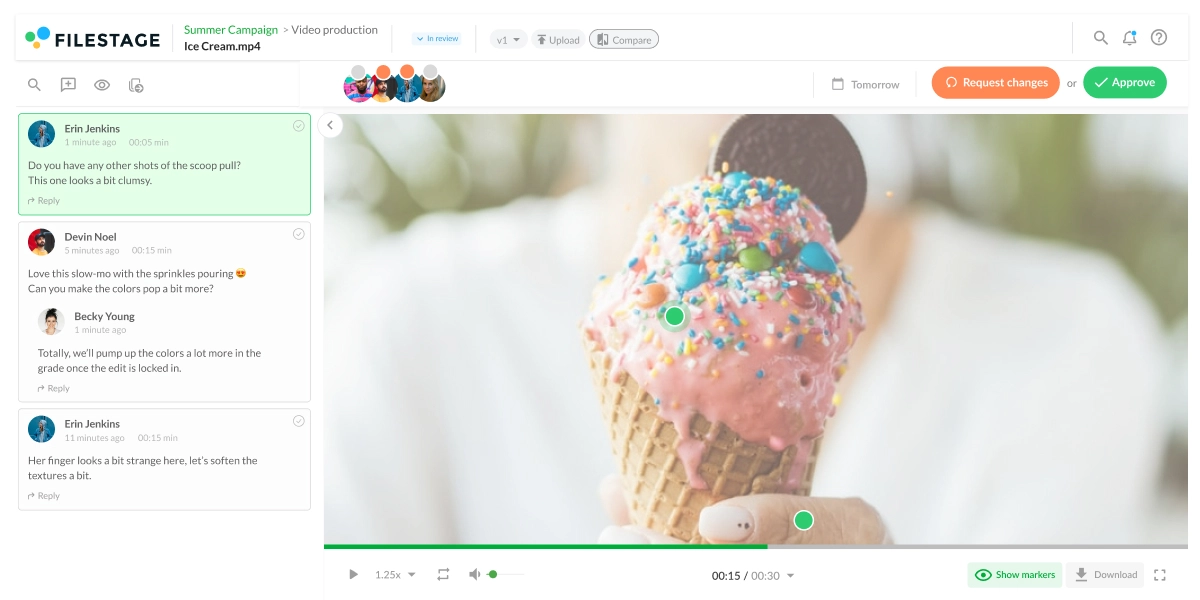
“Filestage helped us reduce miscommunication in video approvals because the feedback can no longer get lost over a series of emails.”
Angelika Schneider, Executive Creative Direction Motion Design
Choose Filestage for video annotations and approvals
As soon as you’ve uploaded your videos, Filestage transforms into a powerful and collaborative video annotation tool. This replaces all the pains of consolidating video feedback over email, helping you to deliver better quality videos in less time.
Here are a few ways Filestage helps to speed up your video workflow:
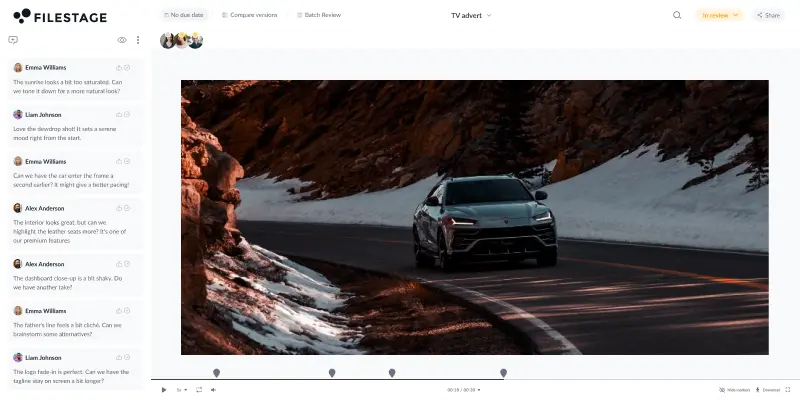
- Markers and timestamps: Click anywhere on a video file to create a marker and add a comment with an automated timestamp.
- Video annotations: Draw on videos with a pen tool, lines, arrows, and boxes to make your feedback crystal clear.
- Comment threads: Discuss feedback, tag teammates, and add attachments to keep everything in context.
- Version control and comparison: Keep a clear version history so you can revisit previous edits and feedback, and compare versions and comments side by side to verify changes.
- Approval workflows: Set up approval workflows for your project, so you can make sure every video gets signed off by the right people.
- Adobe Creative Cloud integrations: Render sequences from Premiere Pro and After Effects directly to Filestage, and see feedback in real time in your project timeline.
Pricing and storage limits
Filestage’s Free plan gives you 2 GB secure storage with one active project, and unlimited reviewers. This should be enough for any large video file that you need to share.
If you need more cloud storage space, you have three paid options to choose from:
- Starter: $199/month – 1 TB storage
- Business: $329/month – 3 TB storage plus advanced collaboration features
- Enterprise: Contact sales for pricing – 10 TB storage plus advanced security features
Supercharge your video review rounds
See how Sharp, Sixt, and GroupM make video feedback quick and easy for everyone.
Choose the best video file sharing solution for your use case
Let’s look at three different use cases to help you find the best video upload site for your situation:
- You rarely share video files and don’t need feedback or approval
Go for WeTransfer. Assuming your video is under 2 GB, this will allow you to upload your video and send a transfer link to anyone who needs it. Just make sure they download it within seven days, otherwise the link will time out! - You share video files regularly but don’t need feedback or approval
Go for Google Drive. You’ll get 15 GB of free storage, unlike the 2 GB limit of competitors like Dropbox. And you’ll also be able to choose exactly which email accounts can watch or download your videos. - You share video files regularly for feedback and approval
Go for Filestage. You can upload videos up to 20 GB each. And unlike all the other options, you can collect feedback, manage versions, and collaborate on your content – from v1 to final!
Your video sharing questions, answered
How do you reduce file size to share videos online?
You can reduce the file size of your videos by rendering a smaller version or compressing them with a tool like Handbrake. You can read our full guide on how to share large video files here.
What’s the best way to share a video online?
Filestage is the best way to share videos online if you want to get feedback and collaborate on your content. But if you just want to send a video with a link and your video is less than 2 GB, WeTransfer will do the job.
What’s the best method for sharing private videos?
You can share private videos by uploading them to your Filestage project and turning on password protection. This will add a password to all the files in your review step, so you don’t need to worry about sending different passwords for every private video you share.
How do you share large videos online?
Share large videos online (up to 20 GB) with Filestage. Invite your reviewers to take a look or copy and paste the link into an email or chat message. Then everyone can add feedback and collaborate in the comments until you get approval.
How do you upload a video to a link?
Upload your video to Filestage, then invite your teammates and reviewers within the platform or copy and paste the URL to an email or chat message. Anyone with the link will be able to view your content in their browser, from any device, helping to keep your review and approval process moving forward.
How do you share large video files for free?
Filestage and WeTransfer both offer 2 GB free storage space, while Google Workspace gives you 15 GB completely free.
By uploading your videos to any of these tools, you’ll be able to create a shareable link that you can send on to teammates and clients. But if you want to share large video files regularly, you’ll likely need a paid plan.
Can you share large video files by email?
You can only share video files up to 25 MB when uploading them as attachments. But if you upload your videos to a tool like Filestage, WeTransfer, or Dropbox, you’ll be able to paste a link into your email and get way more free storage for sharing your videos.
How do you share a video with multiple people?
You can share a video with multiple people using Filestage. Simply create a project and review step (for example: Marketing team). Then invite all the people you want to see your video and give feedback. And the best bit? When you upload new videos or versions to your project, it’ll be shared with the same people automatically!
How do you create professional looking videos?
If you want to create professional looking videos, you need to establish a solid video production process. This includes everything from the video editor, to the video editing experience, to the video review and approval process. By considering each of these stages carefully, you’ll be able to deliver videos that you’re truly proud of.
Final thoughts
Video is one of the most exciting and effective marketing formats. But sharing videos online and collecting feedback makes it a pain. If you’ve ever tried to consolidate timecodes and comments about your video content, you’ll know what I mean.
Filestage’s video collaboration software makes all those pains go away. You can set up projects and review steps to centralize your review process. Then you can share videos and collect feedback across multiple versions until you get approval. Ready to give it a try? Start a free trial →