If you’re in charge of social media for your company, you’ll know how painful getting feedback and approval on your posts and campaigns can be. Especially when there are lots of stakeholders involved. Even more so when you’re working to a tight deadline.
Conflicting opinions. Non-stop chasing. Round after round of amends. You haven’t got time (or the patience) for this!
But with effective social media approval processes in place – and the right marketing approval software to help you out – things become a whole lot easier and a whole lot faster.
In this guide I’ll walk you through the five-step social media content approval process and share five best practices to make your workflow more efficient. Missed deadlines and up-all-night stress will soon be a thing of the past.
Approve all your social content in one place
Get quick and clear feedback right on top of your content with Filestage.
The five-step social media approval process
The key to a smooth, simple, and successful social media approval process is using specifically designed software to help you out. With the right platform, you can bring together all your projects, assets, versions, stakeholders, and (most importantly) feedback – all in one place.
Here’s what an effective five-step social media approval workflow looks like:
1. Set up your project and review steps
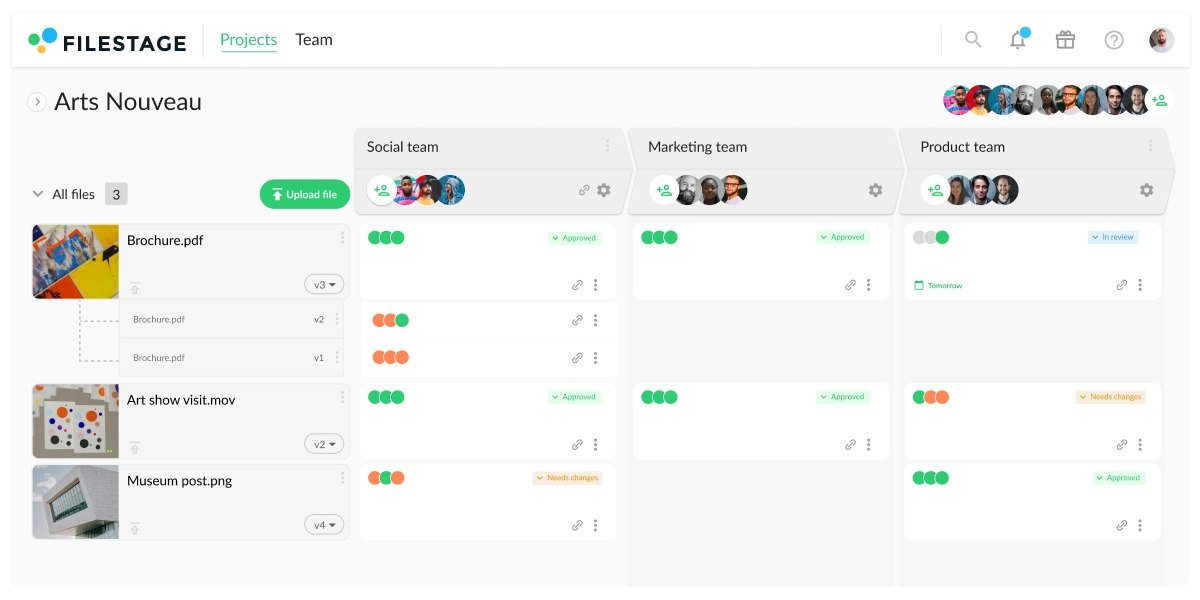
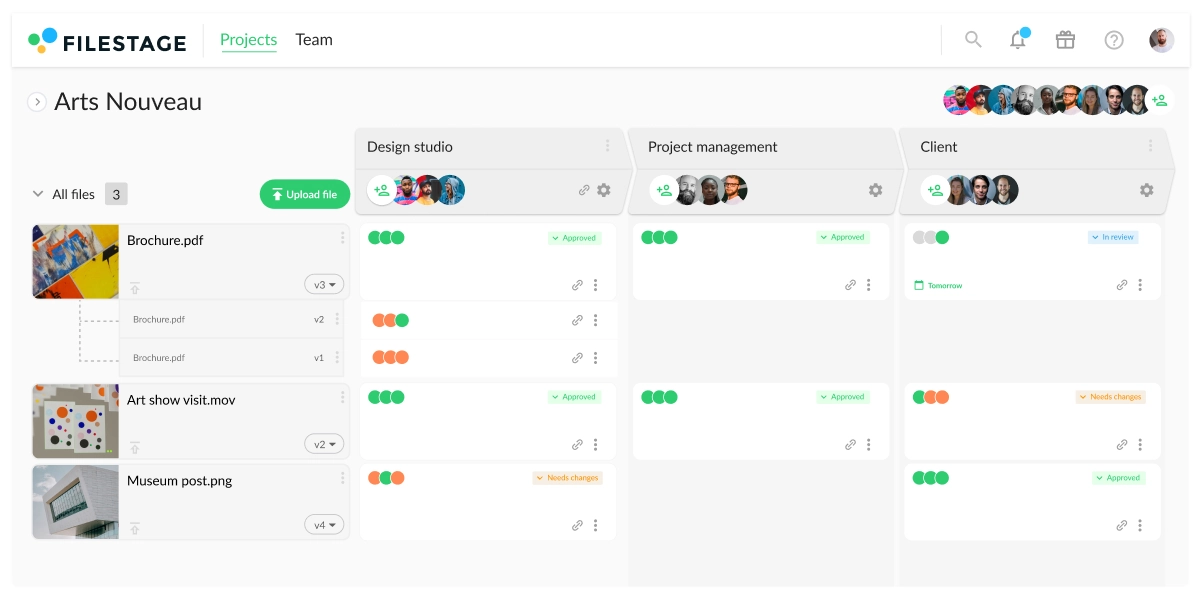
In Filestage, your project is the home of any assets related to your social media campaign, no matter what file format or channel they relate to. For an Instagram campaign it might include videos, photos, and the accompanying copy. For a Twitter campaign it might be graphics and text.
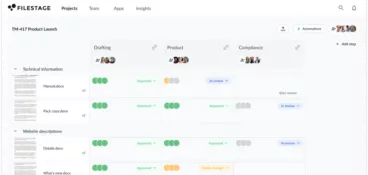
Once your project is up and running you’ll be able to see things like:
- Who has approved each file
- How many versions have been shared
- Which files have feedback that’s ready to be worked on
- How many comments have been added
- Who still needs to submit a review decision
A social media manager can then set up review steps to clearly define who needs to look at assets at each stage of the process. You might start out by consulting the rest of the social team in step one, then bring in the wider marketing team and the product team (or the client if you’re on the social media agency side) in step two. The final step might involve getting sign-off from compliance and senior leadership to make sure everyone is on the same page.
2. Upload your content calendar and assets for approval
You’ve created a project and set up your review steps. Now it’s time to share your content. You might want to start by uploading your content calendar to your project to get approval on concepts. Once you’ve got the green light, you can create the assets themselves and share them for feedback and approval.
Need help creating content in the first place? Check out our roundup of the best social media content creation software.
3. Invite reviewers and set due dates for feedback
Your assets are uploaded, now you can invite your reviewers to the relevant review steps, and add due dates for each file and step. That way, everyone knows when their feedback is needed to keep things moving forward. And if people still haven’t given feedback before the due date, Filestage will send them an automatic reminder so that you don’t have to chase.
4. Collect feedback and collaborate with your reviewers
Review steps? Check. Assets uploaded? Check. Due dates set? Check. Time to sit back and relax as your feedback rolls in.
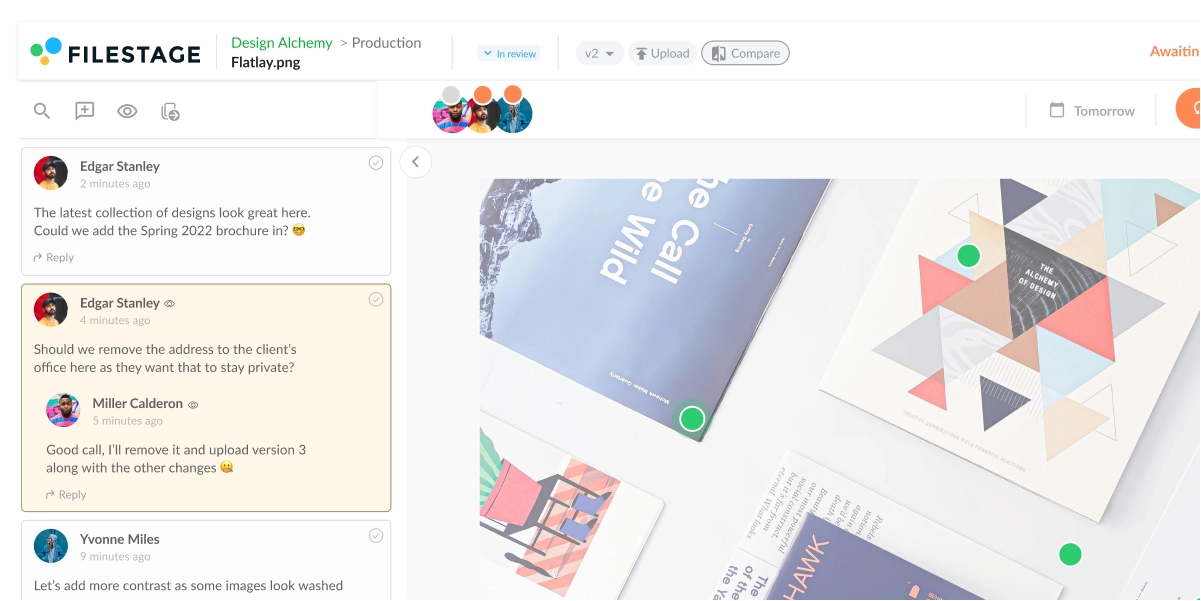
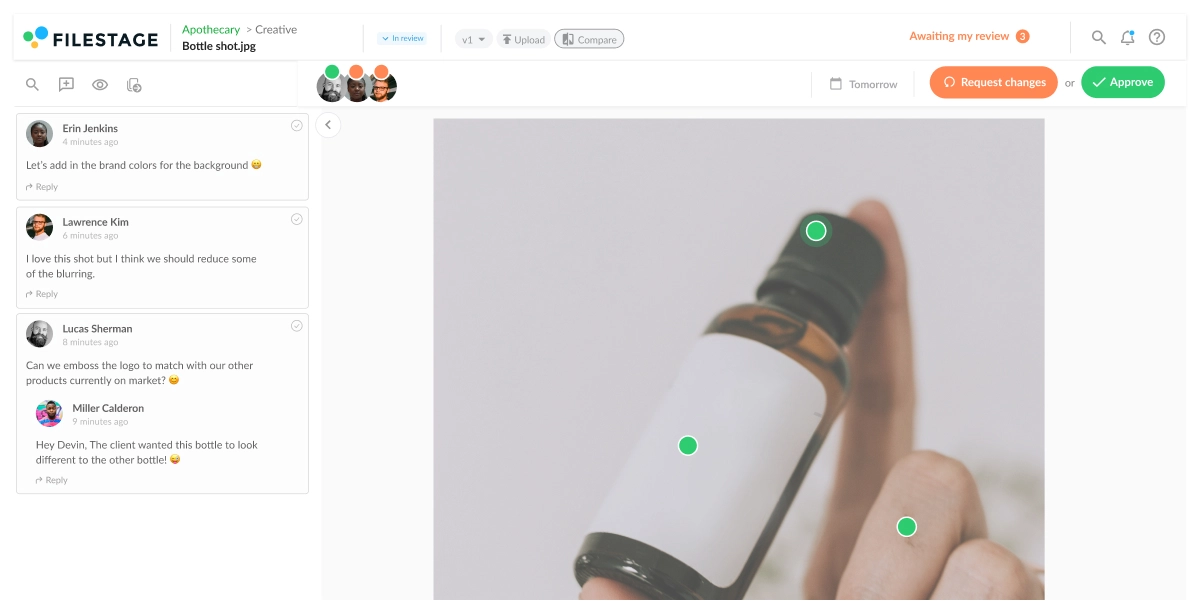
In Filestage, adding feedback is easy, dynamic, and collaborative. Reviewers can use annotation tools to highlight, strike through, add shapes and emojis, and even draw freehand directly on top of your content. They can add attachments too.
For video content, they can click and comment, and their feedback will be attached to that timecode. Just click on their comment and you’ll jump to that frame in the video.
And because everyone in each review step gives feedback in the same place, it’s easy to reply to comments, tag teammates, and resolve conflicts so that everyone is aligned before you get started on the next version.
5. Make edits and share new versions until you get approval
Once you’ve received everyone’s feedback and clarified any questions or conflicts, you can implement the changes and share the updated version with the review team. You might have to go through a couple of rounds of amends, then once everyone’s given the green light, you’re ready to go live with your social media content!
It’s as easy as that!
Five best practices for your social media approval workflows
Now that you know the steps, let’s take a look at how you can speed up the social media content approval process to make sure every post and story goes live exactly when it’s supposed to.
1. Collect feedback on top of your content
Collecting feedback from email, chat, and all manner of other sources is always a struggle. Especially when it comes to visual content. When you’re trying to figure out exactly which parts of an image, a design, or – harder yet – a video everyone is talking about, that struggle quickly escalates into mission impossible!
Collecting feedback right on top of your content helps to make comments much clearer and avoid frustrating miscommunication.
Here are a few other ways Filestage makes feedback easier:
- Zoom, rotate, and drag to hone in on every detail of your social media designs
- Click anywhere to create a marker and add a comment
- Highlight text to give feedback on a specific word or sentence in a social post
- Strikeout text to show which parts should be deleted
- Draw annotations to make feedback clearer and more visual
- Add attachments to your comments like references and essential assets
Approve all your social content in one place
Get quick and clear feedback right on top of your content with Filestage.
2. Keep discussions in context to avoid conflicts
When you’re managing feedback from multiple stakeholders and dealing with their (often conflicting) comments and thoughts, things can get pretty confusing.
With Filestage, you and your reviewers can collaborate in real time. Comments appear right away, in context, and for everyone to see, so you can iron out any conflicts there and then.
With Filestage, you can also:
- Tag people in a comment thread to bring them into the conversation
- Post team-only comments and replies to talk privately with your teammates
- Save comments with timestamps, so you have a record of every discussion
3. Tick off comments while creating the next version
With multiple review rounds full of multiple recommendations from multiple stakeholders, it can be challenging to keep track of what you’ve already actioned and what still needs doing.
One of the most effective – not to mention rewarding – practices is to tick off comments as you go along.
With Filestage, you can easily manage feedback by ticking off comments as you resolve them, leaving you with a clear picture of what you still need to act on. That way, you minimize your chances of forgetting anything and getting set back.
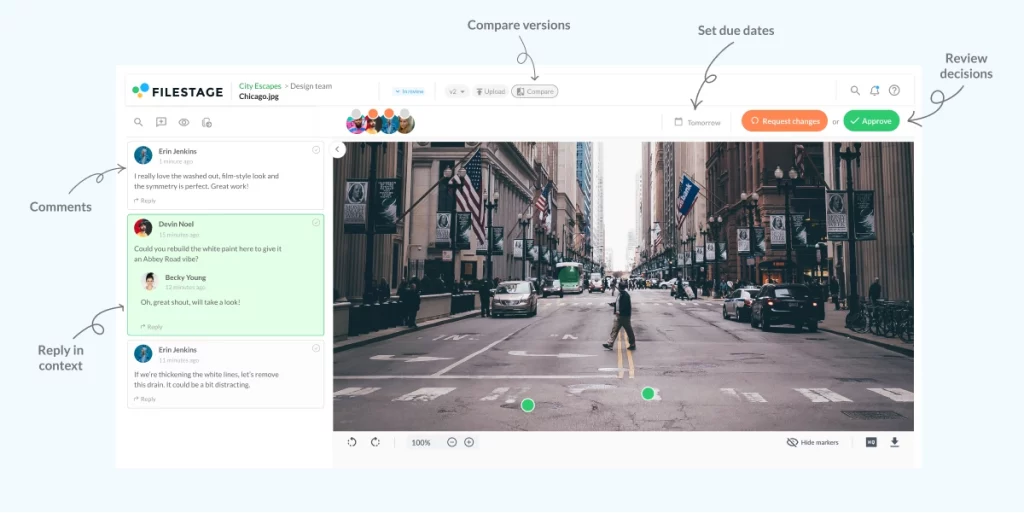
4. Make it easy for reviewers to compare versions
When reviewing the latest version of your social media content, you reviewers might want to see a before and after to be sure that the latest amends were worthwhile. They might also want to check that all their feedback has been implemented.
By giving them an easy way to do this, you can dramatically speed up the social media approval process.
With Filestage, you can see two versions of your social media content side by side in one platform:
- Choose which two versions you want to compare
- Show and hide the comments for both versions
- Click on comments to show which part of the design or post they refer to
- Add or reply to comments while comparing versions to make sure you have full context
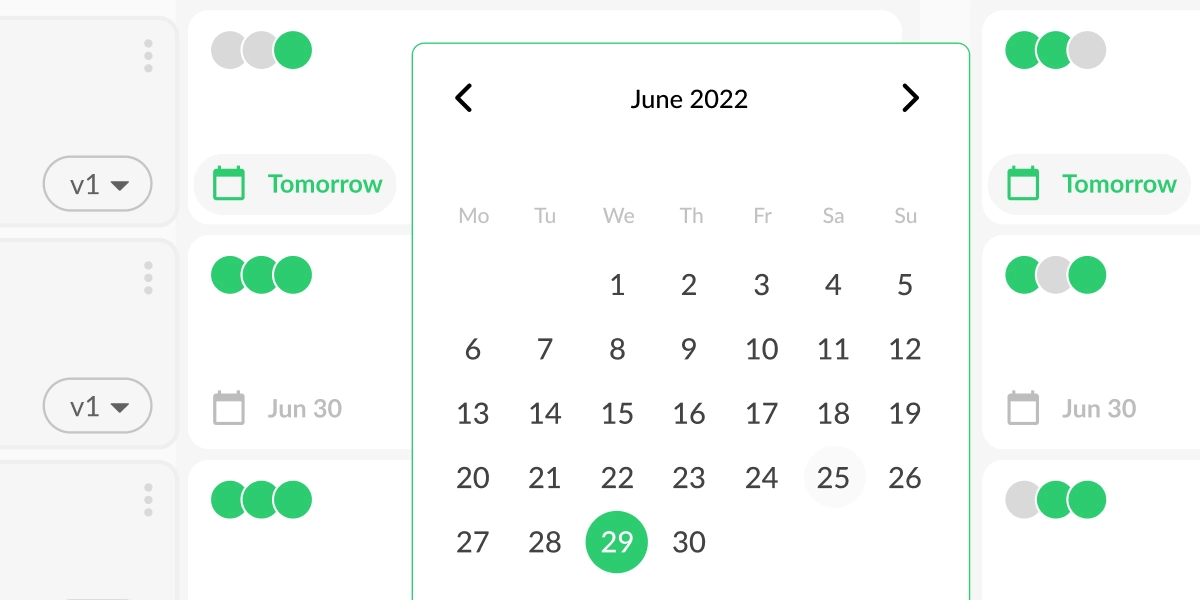
5. Set review due dates to avoid delays
Every social media post is timely, which means you can’t afford to get delayed and miss a deadline. When you need feedback and approval from multiple stakeholders, timelines can get pushed to their absolute limits.
To get around this, it’s a good idea to set deadlines for every round of feedback. That way, your reviewers can prioritize their workload, making sure you get what you need, when you need it.
With Filestage, you can set due dates for each file review. Your reviewers will receive automated reminders when the deadline is approaching, which saves you the job of chasing and hassling. It’s a win-win situation!
Hungry for more? Check out our social media workflow best practices.
Top five social media management tools for more efficient approval workflow
If you’re looking to speed up all aspects of your social media approval workflow, your team should invest in specialized social media platforms.
Here’s a list of the top four social media management tools with their pros, cons, and pricing.
1. Hootsuite
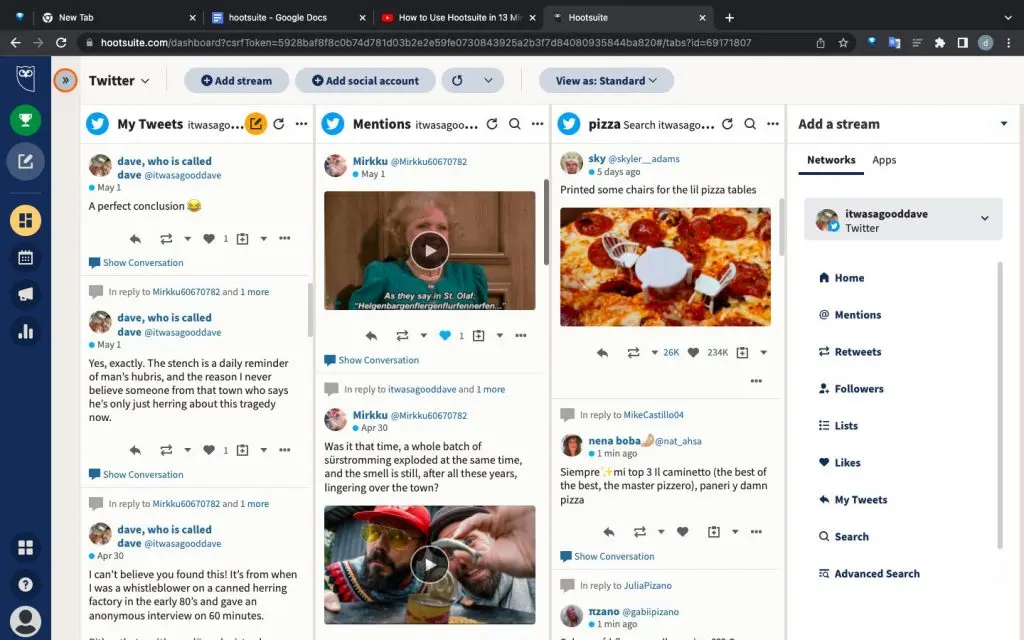
Hootsuite is a comprehensive social media management tool that allows you to manage multiple social media accounts and collaborate with team members. It offers features like content scheduling, post approval workflows, and a centralized approval dashboard.
Pros
- Hootsuite supports a wide range of social media platforms, including Facebook, Twitter, Instagram, LinkedIn, and more, which allows you to manage multiple accounts from a single dashboard
- It offers robust scheduling capabilities, allowing you to plan and automate your social media posts in advance. This feature is especially useful for maintaining a consistent posting schedule
- It provides tools for team collaboration, allowing multiple team members to work together on social media campaigns
- Hootsuite provides monitoring features that allow you to track mentions, hashtags, and engagement across different social media platforms
- The tool integrates with a wide range of third-party tools and services, such as Google Analytics, Canva, and Zendesk
Cons
- It’s pricing can be a drawback for some users, especially for small businesses or individuals with limited budgets
- While Hootsuite offers a user-friendly interface, the platform can be overwhelming for beginners who are new to social media management
- Hootsuite’s primary focus is on scheduling and publishing content, but it lacks some advanced engagement features offered by other tools
- Some users find Hootsuite’s customization options limiting
- The tool’s functionality relies on the APIs provided by social media platforms. Changes in the APIs or policies of these platforms may impact certain features or cause disruptions in the service
Pricing
Hootsuite offers four different pricing plans, including:
- Professional Plan – $99/month
- Team Plan – $249/month
- Business Plan – $739/month
- Enterprise Plan with custom pricing
2. Filestage
Filestage is another powerful social media approval tool that provides a streamlined approval workflow. It enables team members to collaborate, review and approve posts before they are published. You can create various projects for different social media channels, and make sure that all the content that gets published accurately reflects the social media strategy.
Pros
- Filestage provides a structured and streamlined approval workflow for social media content which allows you to create custom approval stages, set deadlines, and assign tasks to specific team members involved in the approval process
- With Filestage, team members can provide visual feedback directly on the social media content. They can highlight specific areas, add comments, and suggest changes, making the review process more interactive and precise.
- The tool maintains a version history of all social media content, enabling you to track changes made during the approval process
- Filestage allows you to share social media content files securely within the platform by providing a centralized hub for all files related to your social media campaigns, making it convenient for your social media team members to access, review, and approve content from a single location
- It integrates with popular project management and communication tools like Slack and Trello, enabling seamless collaboration and communication among team members during the social media approval process
Cons
- Filestage is primarily designed as a file collaboration and approval tool, so it may not have some advanced features specific to social media management, such as post scheduling or analytics
Pricing
Filestage offers different pricing plans, including:
- Free plan with unlimited files, versions, and reviewers
- Basic Plan – Starts at $49/month and includes more projects and storage
- Professional Plan – Starts at $249/month and includes more storage and complex features like compare versions, and automation
- Enterprise Plan – Custom pricing (contact sales)
3. Buffer
Buffer is a popular social media approval tool known for its simplicity and user-friendly interface. While it doesn’t offer an elaborate approval workflow, it allows team members to collaborate and seek approvals before scheduling social media posts across various platforms.
Pros
- Easily collaborate on Facebook, Instagram, Twitter or LinkedIn post ideas for your business before publishing
- Buffer has a clean and intuitive interface that is easy to navigate which makes scheduling and publishing social media content straightforward, even for beginners
- It supports multiple social media platforms, including Facebook, Twitter, Instagram, LinkedIn, and Pinterest
- Buffer offers content curation features that allow you to discover and share relevant social media content from trusted sources
- It provides basic analytics and insights about your social media performance where you can track engagement metrics, analyze post performance, and gain insights into your audience’s behavior to optimize your social media strategy
- Buffer offers team collaboration features, allowing project managers and social media managers to work together and manage user roles and permissions
Cons
- Buffer’s primary focus is on content scheduling and publishing, but it lacks some advanced engagement features found in other tools.
- While it supports popular social media platforms, it may not cover all platforms or have access to certain advanced features unique to each platform
- Although it provides basic analytics and insights, it may not offer the same level of in-depth analysis and reporting as specialized social media analytics tools
- Some advanced features, such as social media marketing and retargeting, detailed reporting, and custom branding, are only available in Buffer’s higher-priced plans
- While Buffer offers content curation features, the range and sources of curated content may be limited compared to dedicated content discovery tools
Pricing
Here are the four pricing plans offered by Buffer:
- Free Plan – $0/per month
- Essential Plan – $6/per month for one channel
- Team Plan – $12/per month for one channel
- Agency Plan – $120/per month for 10 channels
4. Agorapulse
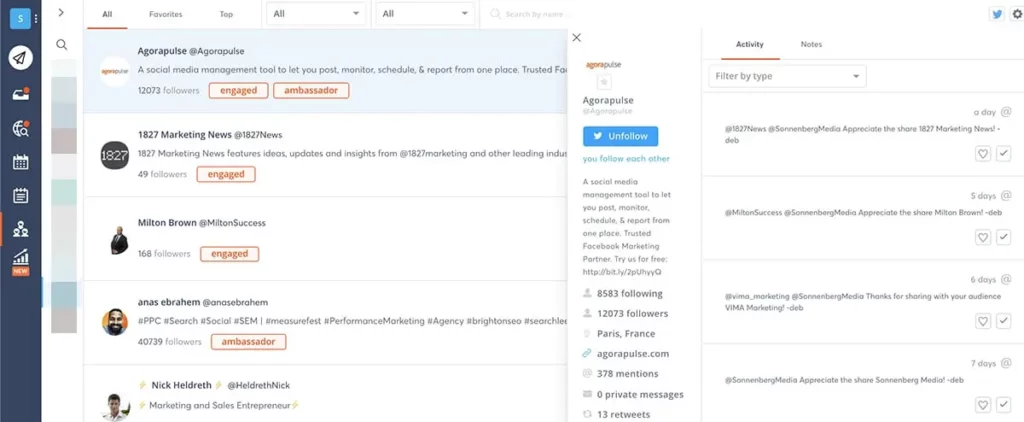
Agorapulse is a comprehensive social media management tool that provides features like content scheduling, post approvals, and team collaboration. It offers a customizable approval workflow, allowing you to define specific stages and roles for different team members.
Pros
- Agorapulse offers a wide range of features for social media management, including content scheduling, publishing, monitoring, analytics, and community management
- It provides in-depth analytics and reporting features that help you track the performance of your social media campaigns
- Agorapulse consolidates your social media messages and comments into a unified inbox, making it easier to manage and respond to audience interactions
- The tool provides a content calendar that enables you to plan, organize, and schedule your social media content in advance. You can create a content queue, automate posting times, and maintain a consistent publishing schedule.
- Agorapulse allows you to monitor keywords, hashtags, and mentions across various social media channels
Cons
- It offers a robust set of features, but its extensive functionality can have a learning curve, especially for users who are new to social media management tools
- Agorapulse’s pricing can be a drawback for smaller businesses or individuals with limited budgets
- Limited platform integrations with third-party tools or platforms that you may be using for your social media strategy
- Agorapulse doesn’t support post scheduling for personal social media profiles
- Mobile app limitations
Pricing
Agorapulse offers four different pricing plans, including:
- Standard Plan – $49/per user per month
- Professional Plan – $79/per user per month
- Advanced Plan – $119/per user per month
- Custom Plan – custom pricing
How social media platforms help you speed up your social media approval process
Giving or collecting feedback on social media content without a proper tool can be a long and time-consuming process. And time is often the one thing you don’t have on your side. Social media approval software like Filestage can help to speed up the process.
Here’s how:
- One platform for everything – save time searching for the latest versions of your assets and scattered feedback
- File formats – review videos, images, copy docs, PDFs, audio files, and more
- Due dates – to keep your projects on track and help you meet deadlines
- In-context comments and visual annotations – for clear feedback that shows up in real time
- To-do lists – turn comments into a to-do list so that your team knows exactly what needs amending
- Version history – to keep tabs on previous comments
- Review steps – so your assets get approved by the right people at the right stage of the process
- Project dashboards – to keep track of who you’re still waiting to hear from
For more details on how dedicated social media approval software helps you speed up your approval process and overcome three major productivity killers in marketing collaboration, check out the video!
Final thoughts
I hope you’ve enjoyed learning about the social media approval process and the best practices that will make your workflow more efficient.
If you’d like to see for yourself how Filestage could help with your social media approval workflow, you can start a free trial here →