Google Docs has become synonymous with effective online document collaboration. The tool has been changing the game in how we co-create and store documents in the cloud, which has won Google over two billion users.
Its simple and intuitive annotation feature is something that keeps Google users loyal to Google Drive, despite the emergence of more specialized annotation tools.
So let’s take a closer look at how to annotate Google Docs in three simple steps.
Annotate Google Docs in seconds with these three steps
Here are the three easy steps for annotating Google Docs:
- Open your Google Drive and create a new Google Docs document that you want to annotate
- Highlight the text or object that you want to annotate
- Click the Comment button (it looks like a speech bubble with a + symbol) that appears on your right side
If you want to reply to an existing annotation, all you have to do is click on the Reply button that appears below the comment. And if you’re looking to delete an annotation, click on the Delete button that appears once you click on the three dots in the comment bubble.
The collaborative annotation tool for modern teams
Create markers, draw annotations, and leave comments on top of documents, PDFs, videos, designs, and more.
Two more ways to annotate a Google Doc
There are several other ways in which you can annotate a Google Doc depending on your specific needs.
Here are the two different annotation methods you can use:
- Annotating with drawing tools
- Annotating with highlights

1. Annotating with drawing tools
One less common way of annotating Google Docs is by using the drawing tools. This method allows you to become more creative with your annotations as you can determine how you want to design it and where you’d like to place it in the text.
It also allows you to add more visual information by adding different images, shapes, and fonts to your annotations.
To do this, follow these five steps:
- Open the Google Doc that you want to annotate
- Click the Insert menu
- Select Drawing
- Draw the annotation that you want to add
- To add text to your annotation, click on the text field and type your text
2. Annotating with highlights
You can also use highlights to add annotations to your Google Doc.
Follow these four steps for annotating with highlights:
- Open the Google Doc that you want to annotate
- Select the text that you want to highlight
- Click the Highlight button
- Choose the color that you want to use
Once you’ve created your annotation, you can add comments in the comment box that appears. From there on, you can change the color and the size of your text, add a drawing, or attach a file to your comment.
Useful tips for annotating Google Docs
Adding annotations to your Google Docs is not just about highlighting text and adding comments.
Here are some additional tips for annotating Google Docs:
- You can use different colors and sizes for your annotations to make them easier to see
- You can also add drawings, shapes, and images to your annotations
- If you’re annotating a document with multiple people, you can use @mentions to notify them of your comments
- You can also export your annotations as a PDF or Word document
Be sure to check out our dedicated guide on how to annotate a Word document.
Reasons for annotating Google Docs
Once you start annotating your Google Docs you’ll probably wonder how you even managed to create documents before using this feature. Benefits like the improved collaboration and ability to deliver higher-quality projects are just the tip of the iceberg.
Here’s a list of other most important benefits:
- Improve your understanding of the document – When you annotate a document, you’re forced to read it more carefully and think about what it means. This can help you improve your understanding of the document and its content.
- Highlight important information – When you annotate a document, you can highlight important information so that you can easily find it later. This can be helpful for studying or when reviewing the document.
- Ask questions or provide feedback – When you’re reading a document that you’re not familiar with, you can use annotations to ask questions or provide feedback. This can be helpful for understanding the document or for getting help from others on your team.
- Improved collaboration – When collaborating on a document, you can use annotations to communicate your ideas and provide feedback. This can help to improve the quality of the document and make sure that everyone is always on the same page.
- Track your progress – If you’re annotating a document for a longer period of time, you can track your progress and see how your understanding of the document gradually changed.
- Save your thoughts for later – You can use annotations to save your thoughts and ideas about a document for later. This can be helpful if you need to refer back to your thoughts or if you want to share them with others.
How to annotate documents with a more specialized annotation tool
While Google Docs offers a valuable annotation feature, there are some specialized annotation platforms out there that will make your annotation process even more intuitive, secure, and straightforward.
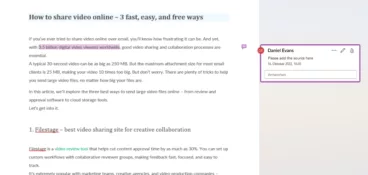
With an annotation platform like Filestage, you can easily markup PDF documents, share videos, graphics, and all kinds of other marketing projects.
It offers project managers a wide range of annotation and proofing features, which makes it easy for your internal and external stakeholders to discuss feedback in context and in real time.
Plus, a range of workflow features will make sure that you never miss a deadline or a game-changing suggestion.
Here are some reasons why you should consider using Filestage for annotations:
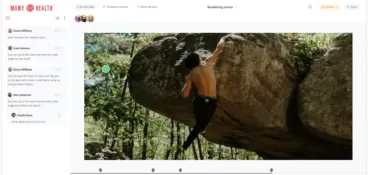
- Collaborative video annotation – Filestage enables multiple stakeholders to review and annotate various file types, including images, videos, and PDF files, in a centralized platform.
- Review workflow management – It offers customizable workflows and task assignments, facilitating seamless collaboration and efficient annotation processes.
- Commenting and markup tools – Users can insert comments, draw annotations, and highlight specific areas within files to provide feedback and suggestions.
- Version control – Filestage keeps track of file versions, allowing reviewers to compare changes and annotations over time.
- Approval and feedback management – It provides features for approving or rejecting annotations and consolidating feedback from multiple reviewers.
Filestage is a more powerful and versatile annotation platform than Google Docs. If you’re looking for a dedicated tool for annotating digital content or documents, Filestage is a good option.
FAQs about annotating Google Docs
1. Can you annotate PDF files in Google Docs?
Yes, you can add limited annotations to your PDF files via Google Docs, but it’s not a straightforward process.
Here are the steps on how to do it:
- Upload your PDF file to Google Drive
- Right-click the PDF file and choose Open with Google Docs
- Click on the Comment button that appears next to the highlighted text
- Type your comment in the text box that appears
For more advanced annotation features, choose a specialized online proofing platform like Filestage and seamlessly annotate your PDF files.
2. Where is the annotation tool in Google Docs?
There are two ways to find the annotation tool in Google Docs:
- From the toolbar – Click on the Insert menu, then select Comment
- From the tool finder – Click on the three dots in the top right corner of the document, then select Show tool finder. The annotation tool will be listed under the Commenting section.
Once you have found the annotation tool, you can use it to add comments, highlights, shapes, and drawings to your document.
3. How to draw on a Google Doc?
To draw on a Google Doc, you can use the Google Drawings tool. Here are the steps on how to do it:
- Open the Google Doc that you want to draw on
- Click on the Insert menu, then select Drawing
- The Drawing window will appear where you can click on the New button to create a new drawing
- You can use the tools in the toolbar to draw shapes, lines, and text
- To save your drawing, click on the Save and close button
4. Can you open comment history in Google Docs?
Yes, you can open the comment history in Google Docs. Here are a few simple steps:
- Open the Google Doc that you want to view the comment history for
- Click on the Comment button in the top right corner of the document
- Click on Open comment history
Final thoughts
Document annotation is one of the biggest benefits of reviewing and editing documents online. When you think about the work that would have to go into annotating physical documents, you soon realize how convenient it is to use Google Docs or a specialized tool like Filestage instead.
If you want to see how Filestage can help you seamlessly annotate your documents, make sure to try it for free →